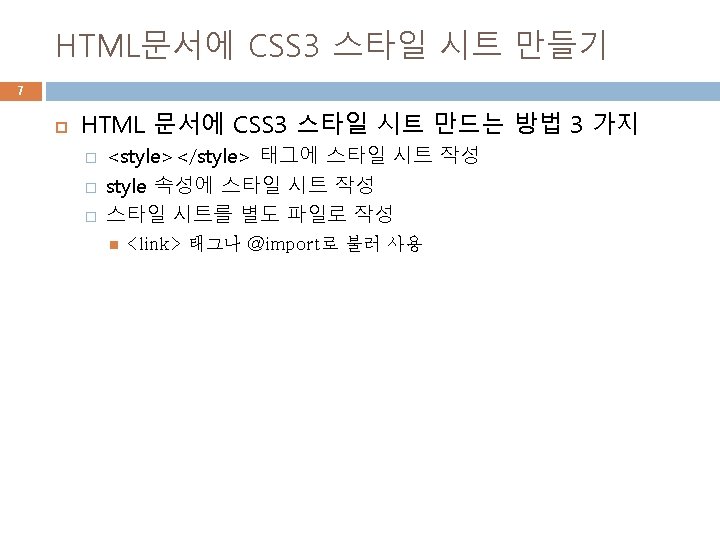
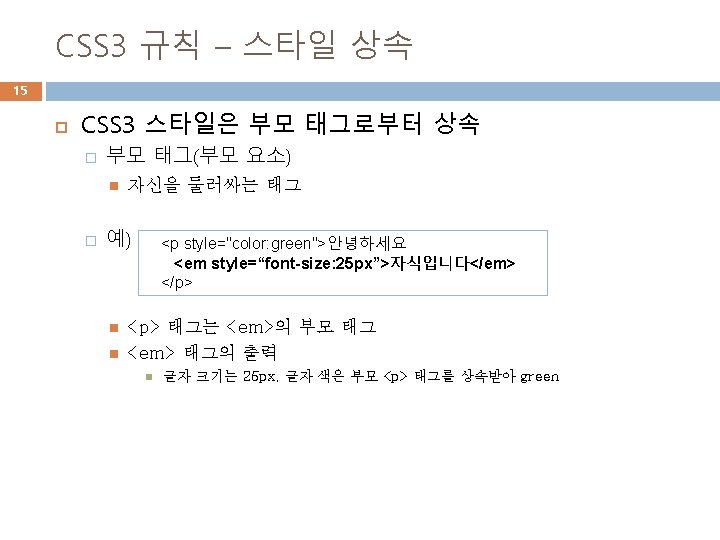
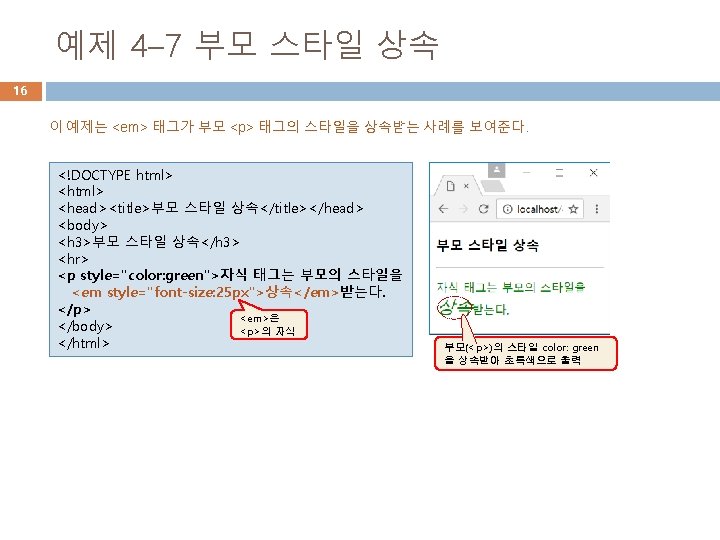
4 2 CSS 3 5 DOCTYPE html body


예제 4– 2 CSS 3 스타일 시트로 꾸민 웹 페이지 5 <!DOCTYPE html> <body>요소의 배경색 mistyrose <html> <head><title>스타일을 가진 웹 페이지</title> <style> /* CSS 스타일 시트 작성 */ body { background-color : mistyrose; } h 3 { color : purple; } hr { border : 5 px solid yellowgreen; } span { color : blue; font-size : 20 px; } </style> </head> <span>의 글자는 blue에 20픽셀 <body> <h 3>CSS 스타일 맛보기</h 3> <hr> <p>나는 <span>웹 프로그래밍</span>을 좋아합니다. </p> </body> </html>
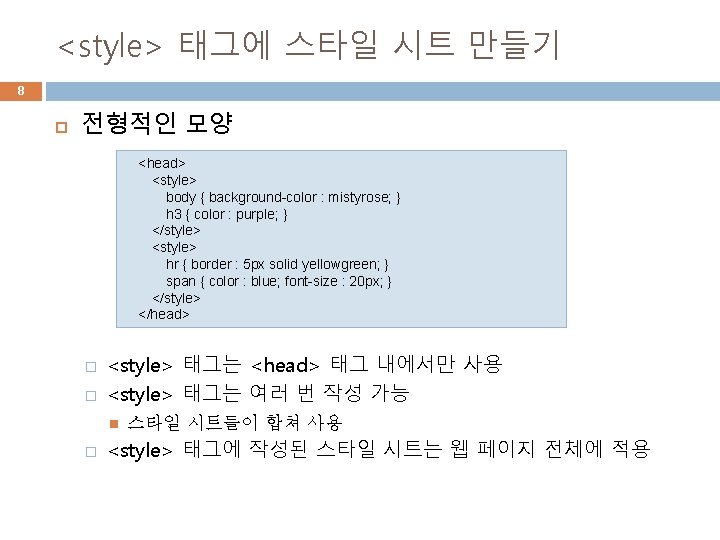

예제 4 -3 <style> 태그로 스타일 시트 만들기 9 <!DOCTYPE html> <head><title>< style> 태그로 스타일 만들기</title> <style> body { linen 색 background-color : linen; color : blueviolet; margin-left : 30 px; margin-right : 30 px; } h 3 { text-align : center; color : darkred; } </style> </head> <body> <h 3>소연재</h 3> <hr> <p>저는 체조 선수 소연재입니다. 음악을 들으면서 책읽기를 좋아합니다. 김치 찌개와 막국수 무척 좋아합니다. </p> </body> </html> blueviolet 색 margin-left: 30 px margin-right: 30 px

외부 스타일 시트 파일 불러오기 12 � . css 파일에 스타일 시트 저장 웹 페이지에서 CSS 3 스타일 시트 파일을 불러 사용 동일한 스타일 시트를 웹 페이지마다 중복 작성 해소 웹 사이트의 전체 웹 페이지 모양의 일관성 확보 <style> /* mystyle. css */ body { background-color: linen; color: blueviolet; margin- left: 30 px; margin-right: 30 px; } h 3 { text-align: center; color: darkred; } </style> � CSS 3 스타일 시트 파일을 불러오는 방법 2 가지 <link> 태그 이용 <head> <link href="mystyle. css" type="text/css" rel="stylesheet"> </head> @import 이용 <style> @import url(mystyle. css); /* @import url(‘mystyle. css’); 로 해도 됨 */ /* @import “mystyle. css”; 로 해도 됨 */ </style>

예제 4 -5 <link> 태그로 CSS 3 파일 불러오기 13 예제 4– 3의 CSS 3 스타일 시트를 mystyle. css 파일에 저장하고, <link> 태그 로 불러 사용하도록 수정하라. mystyle. css /* mystyle. css */ body { background-color : linen; color : blueviolet; margin-left : 30 px; margin-right : 30 px; } h 3 { text-align : center; color : darkred; } <!DOCTYPE html> <head><title>< link> 태그로 스타일 파일 불러오기</title> <link type="text/css" rel="stylesheet" href="mystyle. css"> </head> <body> <h 3>소연재</h 3> <hr> <p>저는 체조 선수 소연재입니다. 음악을 들으면서 책읽기를 좋아 합니다. 김치 찌개와 막국수 무척 좋아합니다. </p> </body> </html>

예제 4 -6 @import로 CSS 3 파일 불러오기 14 mystyle. css /* mystyle. css */ body { background-color : linen; color : blueviolet; margin-left : 30 px; margin-right : 30 px; } h 3 { text-align : center; color : darkred; } <!DOCTYPE html> <head> <title>< @import> 로 외부 스타일 불러오기</title> <style> @import url(mystyle. css); </style> </head> <body> <h 3>소연재</h 3> <hr> <p>저는 체조 선수 소연재입니다. 음악을 들으면서 책읽기를 좋아합니다. 김치 찌개와 막국수 무척 좋아합니다. </p> </body> </html>
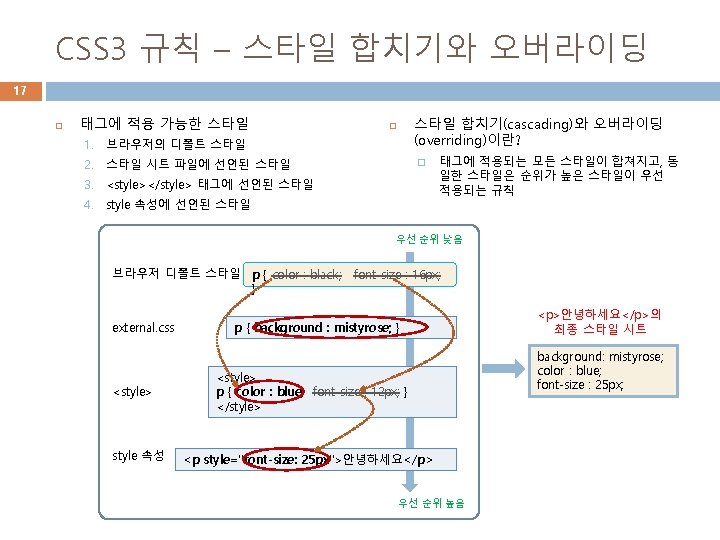

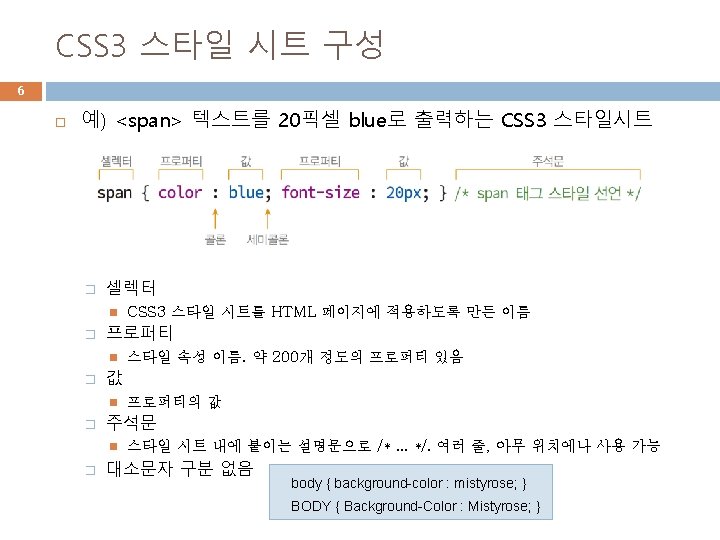
external. css p { background : mistyrose; } HTML 파일 <!DOCTYPE html> <head><title>스타일 합치기 및 오버라이딩</title> <link type="text/css" rel="stylesheet" href="external. css"> <style> p { color : blue; font-size : 12 px; } </style> </head> <body> <h 3>p 태그에 중첩된 스타일</h 3> <hr> <p>Hello, students!</p> <p style="font-size: 25 px">안녕하세요 교수님!</p> </body> </html> 예제 4– 8 여러 스타일 시트가 중첩되는 경우 다음은 <p> 태그에 여러 스타일 시트가 중첩된 경우이다. 출력되는 모양을 예측해보라. background : mistyrose; color : blue; font-size : 12 px; background : mistyrose; color : blue; font-size : 25 px; 18
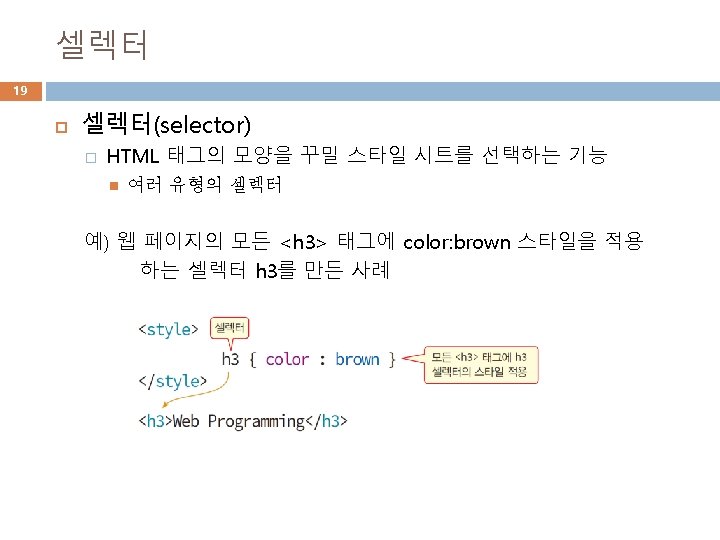

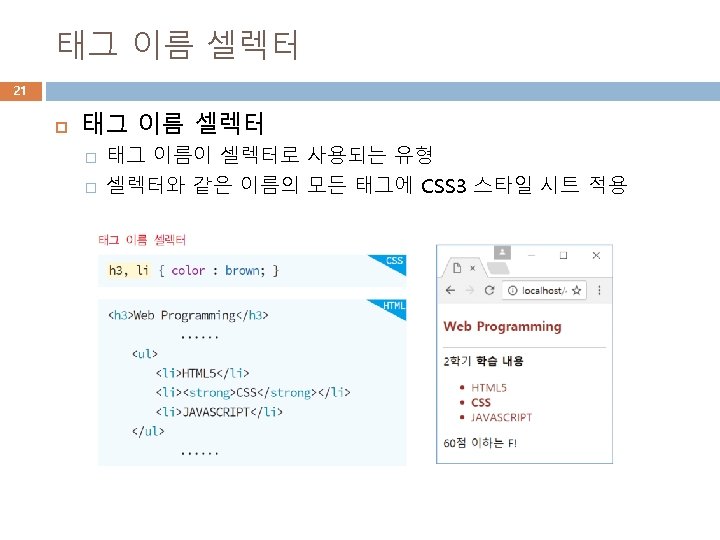
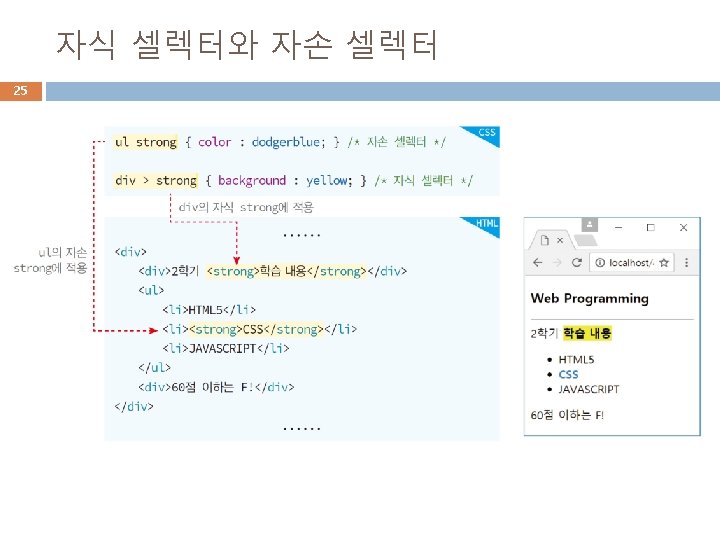
셀렉터 설명을 위한 샘플 HTML 페이지 20 <!DOCTYPE html> <head><title>셀렉터 만들기</title></head> <body> <h 3>Web Programming</h 3> <hr> <div>2학기 <strong>학습 내용</strong></div> <ul> <li>HTML 5</li> <li><strong>CSS</strong></li> <li>JAVASCRIPT</li> </ul> <div>60점 이하는 F!</div> </body> </html>

: firstletter와 : hover의 사용 사례 28

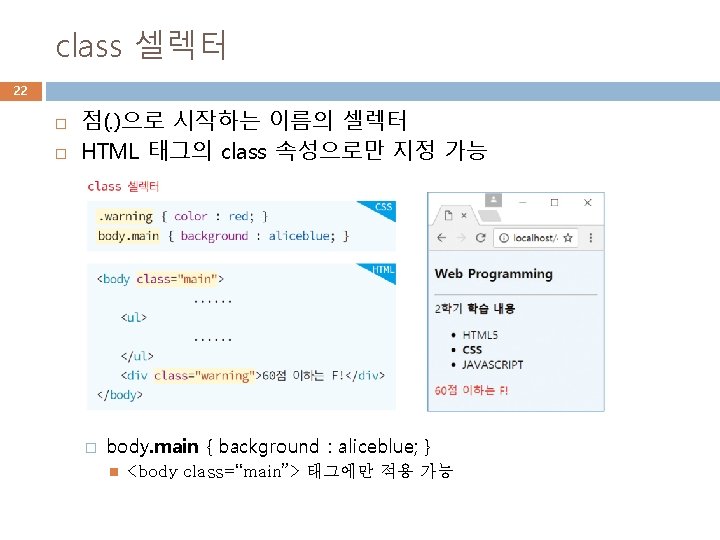
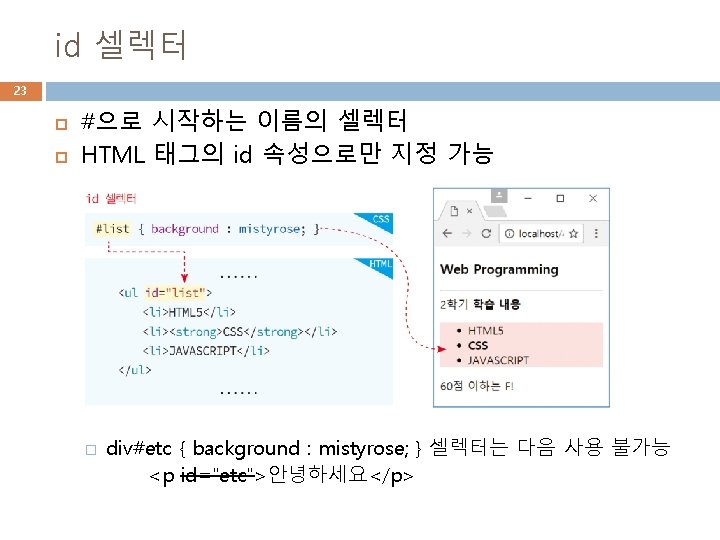
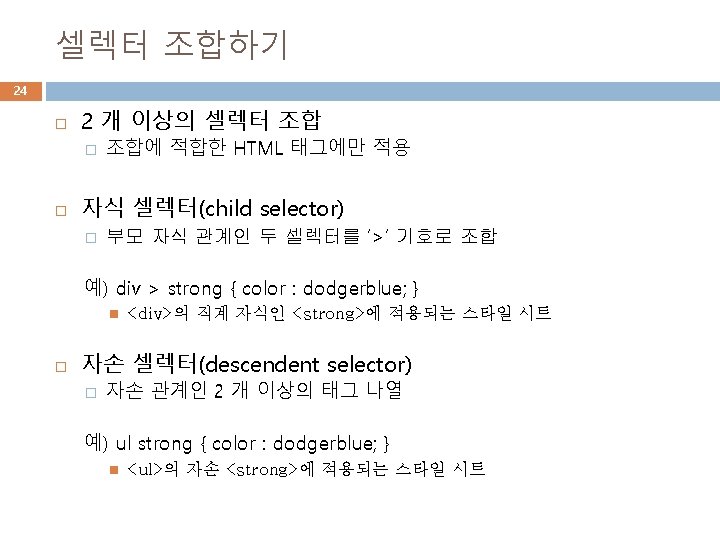
예제 4 -9 셀렉터 활용 29 <!DOCTYPE html> <head><title>셀렉터 만들기</title> <style> h 3, li { /* 태그 이름 셀렉터 */ color : brown; } div > strong { /* 자식 셀렉터 */ background : yellow; } ul strong { /* 자손 셀렉터 */ color : dodgerblue; }. warning { /* class 셀렉터 */ color : red; } body. main { /* class 셀렉터 */ background : aliceblue; } #list { /* id 셀렉터 */ background : mistyrose; } #list span{ /* 자손 셀렉터 */ color : forestgreen; } h 3: first-letter { /* 가상 클래스 셀렉터 */ color : red; } li: hover { /* 가상 클래스 셀렉터 */ background : yellowgreen; } </style></head> <body class="main"> <h 3>Web Programming</h 3> <hr> <div>2학기 <strong>학습 내용</strong>입니다. </div> <ul id="list"> <li><span>HTML 5</span></li> <li><strong>CSS</strong></li> <li>JAVASCRIPT</li> </ul> <div class="warning">60점 이하는 F</div> </body> </html>
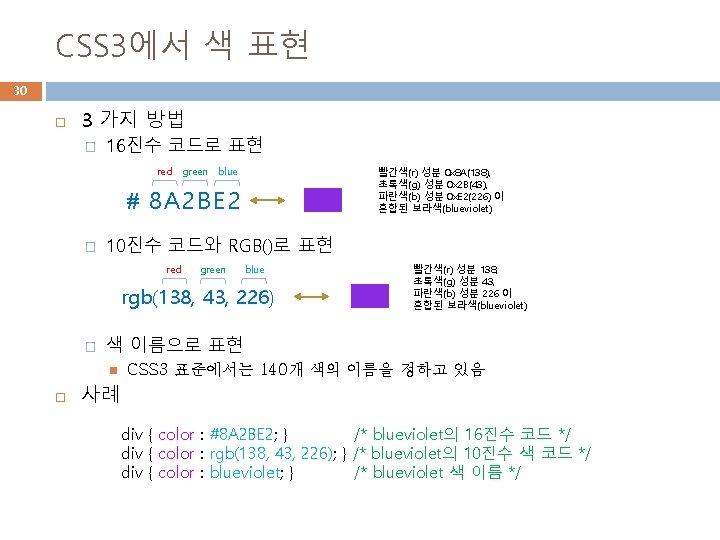
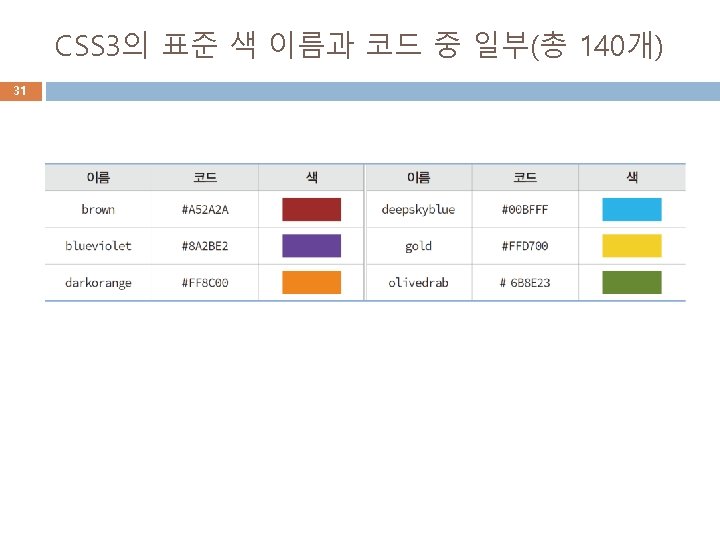

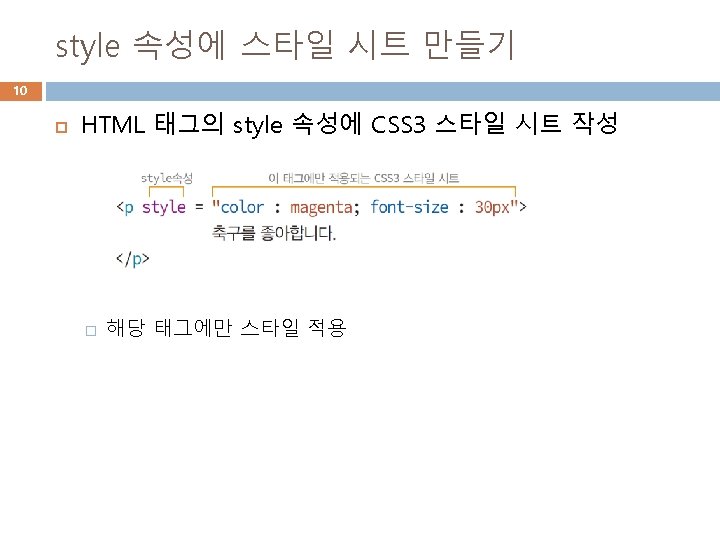
예제 4– 10 색 활용 33 <!DOCTYPE html> <head><title>CSS 3 색 활용</title> <style> 좌우 아래 여백 지정 div { margin-left : 30 px; margin-right : 30 px; margin-bottom : 10 px; color : white; /* 모든 <div> 글자 색은 white */ } </style> </head> <body> <h 3>CSS 3 색 활용</h 3> <hr> <div style="background-color: deepskybl. Bue"> deepskyblue(#00 BFFF)</div> <div style="background-color: brown"> brown(#A 52 A 2 A)</div> <div style="background-color: fuchsia"> fuchsia(#FF 00 FF)</div> <div style="background-color: darkorange"> darkorange(#FF 8 C 00)</div> <div style="background-color: #008 B 8 B"> darkcyan(#008 B 8 B)</div> <div style="background-color: #6 B 8 E 23"> olivedrab (#6 B 8 E 23)</div> margin-left: 30 px </body> </html> margin-bottom: 10 px margin-right: 30 px


폰트 37 CSS 3의 폰트와 모양 Lucida Console 궁서체 oman Courier New n a m r Georgia Joke Arial 맑은 고딕 Forte Times New R 폰트 형 글자 폭 동일 serif Hello Times New Roman 폰트 Serif 형 (serif 있는 서체) Hello Arial 폰트 Sans-Serif 형 (serif 없는 서체) Hello Consolas 폰트 Monospace 형 (글자 폭 동일)
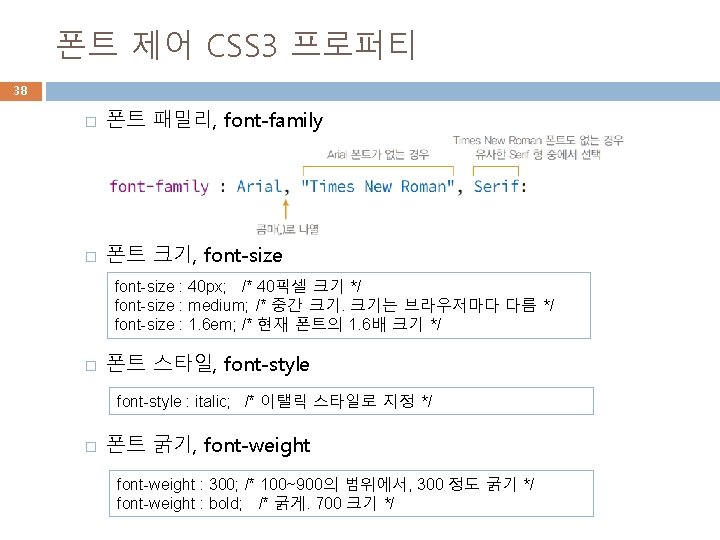

단축 프로퍼티, font 39 font 프로퍼티 � � font-style, font-weight, font-size, font-family를 순서대로 지정 하는 단축 프로퍼티 예) 20픽셀로 이탤릭 스타일에 bold 굵기로 consolas 체 font : italic bold 20 px consolas, sans-serif; font : 20 px consolas, sans-serif; /* font-size, font-family외 생략 가능 */

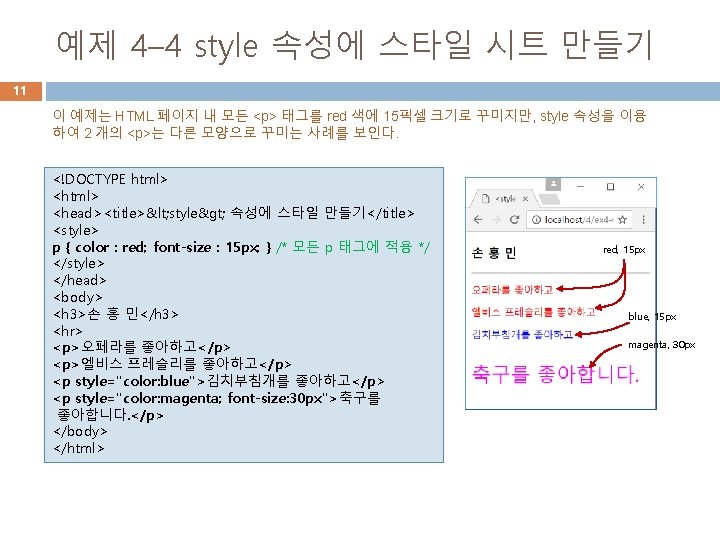
예제 4– 12 CSS 3 폰트 활용 40 es Tim w Ne ma Ro n <!DOCTYPE html> <head><title>폰트</title> <style> body { font-family : "Times New Roman", Serif; font-size : large; } h 3 { font : italic bold 40 px consolas, sans-serif; } </style> </head> <body> <h 3>Consolas font</h 3> <hr> <p style="font-weight: 900">font-weight 900</p> <p style="font-weight: 100">font-weight 100</p> <p style="font-style: italic">Italic Style</p> <p style="font-style: oblique">Oblique Style</p> <p>현재 크기의 <span style="font-size: 1. 5 em">1. 5배</span> 크기로</p> </body> </html> font-size : large font-size : 1. 5 em
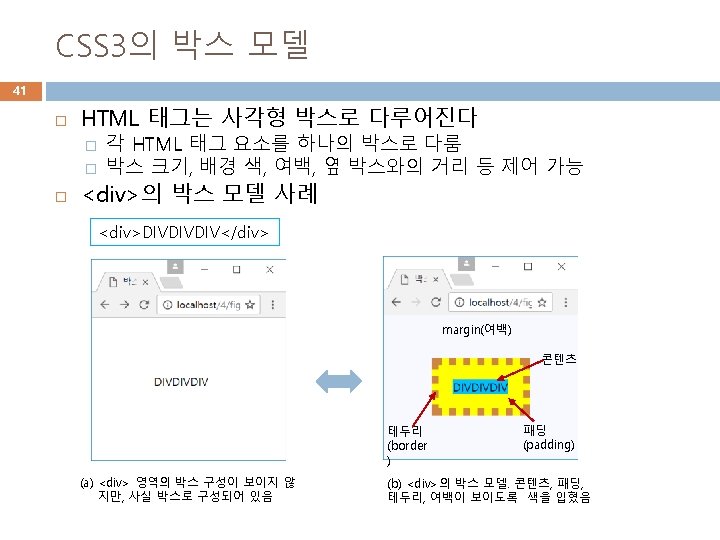


박스 크기 - <div> 태그의 박스 모델 사례 44 CSS 스타일 div. box { width : 150 px; height : 50 px; margin : 40 px; border-width : 30 px; padding : 20 px; } margin : 40 px border-width : 30 px padding : 20 px height : 50 px HTML 코드 <div class="box"> DIVDIVDIV </div> width : 150 px

예제 4 -13 <div>의 박스 모델 보이기 45 <!DOCTYPE html> <head><title>박스 모델</title> <style> body { background : ghostwhite; } Span { background : deepskyblue; } div. box { background : yellow; border-style : solid; border-color : peru; margin : 40 px; border-width : 30 px; padding : 20 px; } </style> </head> <body> <div class="box"> <span>DIVDIVDIV</span> </div> 콘텐츠 영역이 보이도록 파란색 배경의 <span> 태그 삽입 </body> </html> padding : 20 px border : 30 px
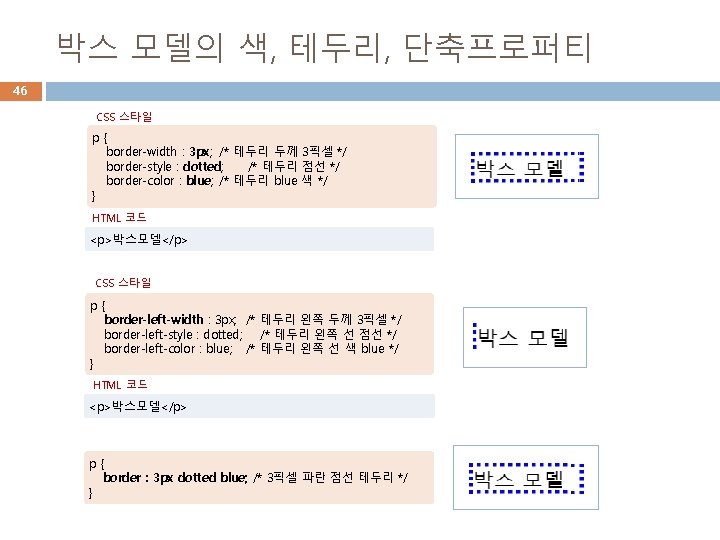

예제 4 -14 박스 모델 활용 47 <!DOCTYPE html> <head><title>박스 모델</title> <style> div { background : yellow; padding : 20 px; border : 5 px dotted red; margin : 30 px; } </style></head> <body> <h 3>박스 모델</h 3> <p>margin 30 px, padding 20 px, border 5 px의 빨간색 점선</p> <hr> <div> <img src="media/mio. png" alt="고양이눈"> </div> </body> </html> margin: 30 px; padding: 20 px; <div>태그의 콘텐츠

예제 4– 15 다양한 테두리 선 스타일 48 <!DOCTYPE html> <head><title>다양한 테두리</title></head> <body> <h 3>다양한 테두리</h 3> <hr> <p style="border: 3 px solid blue">3픽셀 soild</p> <p style="border: 3 px none blue">3픽셀 none</p> <p style="border: 3 px hidden blue">3픽셀 hidden</p> <p style="border: 3 px dotted blue">3픽셀 dotted</p> <p style="border: 3 px dashed blue">3픽셀 dashed</p> <p style="border: 3 px double blue">3픽셀 double</p> <p style="border: 15 px groove yellow">15픽셀 groove</p> <p style="border: 15 px ridge yellow">15픽셀 ridge</p> <p style="border: 15 px inset yellow">15픽셀 inset</p> <p style="border: 15 px outset yellow">15픽셀 outset</p> </body> </html> none과 hidden의 두께 0으로 동일
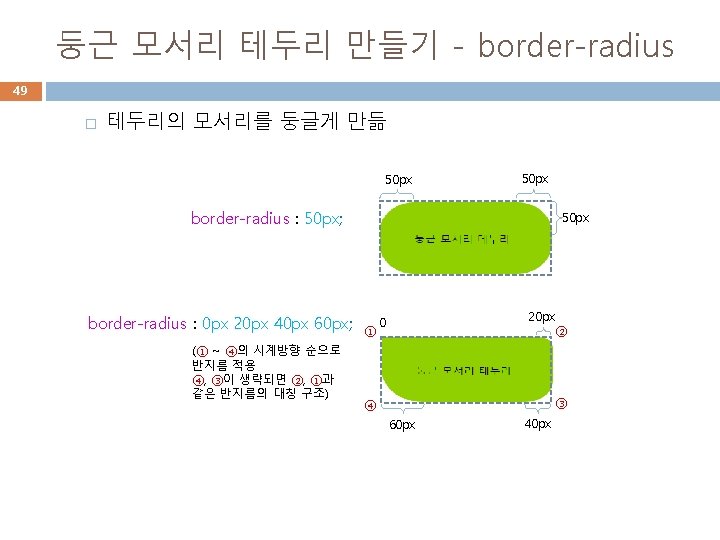

예제 4– 16 다양한 둥근 모서리 테두리 50 <!DOCTYPE html> <head><title>둥근 모서리 테두리</title> <style> p{ background : #90 D 000; width : 300 px; padding : 20 px; } #round 1 { border-radius : 50 px; } #round 2 { border-radius : 0 px 20 px 40 px 60 px; } #round 3 { border-radius : 0 px 20 px 40 px; } #round 4 { border-radius : 0 px 20 px; } #round 5 { border-radius : 50 px; border-style : dotted; } </style> </head> <body> <h 3>둥근 모서리 테두리</h 3> <hr> <p id="round 1">반지름 50픽셀의 둥근 모서리</p> <p id="round 2">반지름 0, 20, 40, 60 둥근 모서리</p> <p id="round 3">반지름 0, 20, 40, 20 둥근 모서리</p> <p id="round 4">반지름 0, 20, 0, 20 둥근 모서리</p> <p id="round 5">반지름 50의 둥근 점선 모서리</p> </body> </html>
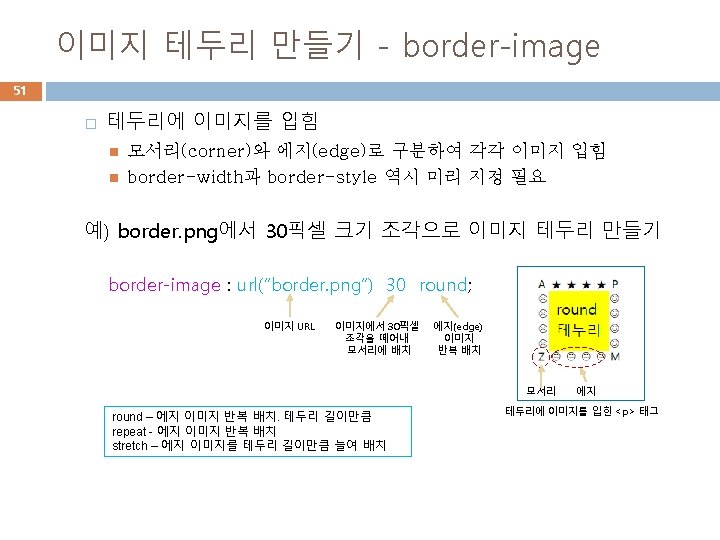
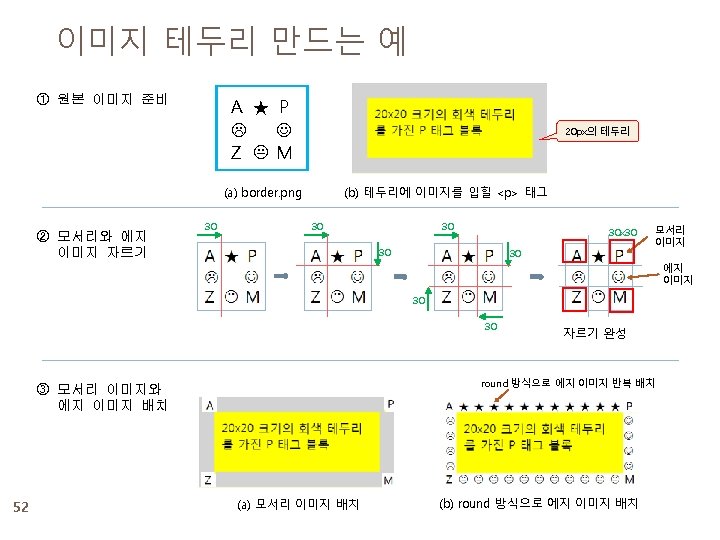

예제 4– 17 이미지 테두리 만들기 53 <!DOCTYPE html> <head><title>이미지 테두리 만들기</title> <style> p{ background : yellow; width : 200 px; height : 60 px; padding : 10 px; border : 20 px solid lightgray; /*border-width와 border-style 동시 지정 */ } #round { border-image: url("media/border. png") 30 round; } #repeat { border-image: url("media/border. png") 30 repeat; } #stretch { border-image: url("media/border. png") 30 stretch; } </style> </head> <body> <h 3>이미지 테두리 만들기</h 3> 테두리 길이에 맞게 <hr> 이미지 크기 조절 다음은 원본 이미지입니다. <img src="media/border. png" alt="원본"> <hr> 이미지 크기 <p>20 x 20 크기의 회색 테두리를 가진 P 태그</p> 조절하지 안음 <p id="round">round 스타일 이미지 테두리</p> <p id="repeat">repeat 스타일 이미지 테두리</p> <p id="stretch">stretch 스타일 이미지 테두리</p> </body> </html>

배경 다루기 54 배경 색이나 이미지지정 background-color, background-image � 둘다 지정되면 배경 이미지가 출력되지 않는 영역에 배경색 출력 예) div { � background-color : skyblue; background-image : url("media/spongebob. png"); } 배경 이미지의 위치, background-position 예) background-position : center; /* 박스 중간에 이미지 출력 */ 배경 이미지 반복 출력, background-repeat 예) background-repeat : repeat-y; /* 위에서 아래로 이미지 반복 출력 */

배경 만들기 연습 CSS 스타일 100 x 100 크기로 <div> 박스의 왼쪽 중간에 배경 이미지 넣기 background-position : left center div { background-color : skyblue; background-size : 100 px; background-image : url("media/spongebob. png"); background-repeat : no-repeat; background-position : left center; } HTML 코드 <div>Sponge. Bob is an over-optimistic sponge that annoys other characters. </div> 100 x 100 크기 background-image CSS 스타일 <div> 박스의 center 위치에 y 축을 따라 배경 이미지 반복 div { background-color : skyblue; background-size : 100 px; background-image : url("media/spongebob. png"); background-repeat : repeat-y; background-position : center; } HTML 코드 <div>Sponge. Bob is an over-optimistic sponge that annoys other characters. </div> 55 background-color

background 단축 프로퍼티 56 background � � 배경을 꾸미는 여러 값을 한 번에 지정하는 단축 프로퍼티 예) div { background : skyblue url("media/spongebob. png") center/100 px repeat-y; } div { background : skyblue; /* 배경색을 skyblue로 설정 */ } div { background : url("media/spongebob. png"); /* 배경 이미지 지정 */ }

예제 4– 18 <div> 박스에 배경 꾸미기 57 <!DOCTYPE html> <html><head><title>배경 꾸미기</title> <style> div { background-color : skyblue; background-size : 100 px; background-image : url("media/spongebob. png"); background-repeat : repeat-y; background-position : center; } div { width : 200 px; height : 200 px; color : blueviolet; font-size : 16 px; } </style> </head> <body> <h 3>div 박스에 배경 꾸미기</h 3> <hr> <div>Sponge. Bob is an over-optimistic sponge that annoys other characters. </div> </body> </html> <div>크기는 200 x 200이며 배경이미지 크기는 100 x 100

텍스트 그림자, text-shadow 58 � text-shadow 프로퍼티 CSS 스타일 div. red { text-shadow : 3 px red; } v-shadow (3 px) HTML 코드 Drop Shadow h-shadow (3 px) <div class="red">Drop Shadow</div> color: red CSS 스타일 div. blur { text-shadow : 3 px 5 px red; } HTML 코드 <div class="blur">Drop Shadow</div> v-shadow (3 px) Drop Shadow h-shadow (3 px) blur-radius color(red) (5 px)

예제 4– 19 text-shadow로 텍스트 그림자 만들기 59 <!DOCTYPE html> <html><head><title>텍스트 그림자</title> <style> div { font : normal 24 px verdata; }. drop. Text { text-shadow : 3 px; }. red. Text { text-shadow : 3 px red; }. blur. Text { text-shadow : 3 px 5 px sky. Blue; }. glow. Effect { text-shadow : 0 px 3 px red; }. word. Art. Effect { color : white; text-shadow : 0 px 3 px dark. Blue; }. three. DEffect { color : white; text-shadow : 2 px 4 px black; }. multi. Effect { color : yellow; text-shadow : 2 px 2 px black, 0 0 25 px blue, 0 0 5 px darkblue; } </style></head> <body> <h 3>텍스트 그림자 만들기</h 3> <hr> <div class="drop. Text">Drop Shadow</div> <div class="red. Text">Color Shadow</div> <div class="blur. Text">Blur Shadow</div> <div class="glow. Effect">Glow Effect</div> <div class="word. Art. Effect">Word. Art Effect</div> <div class="three. DEffect">3 D Effect</div> <div class="multi. Effect">Multiple Shadow Effect</div> </body> </html>
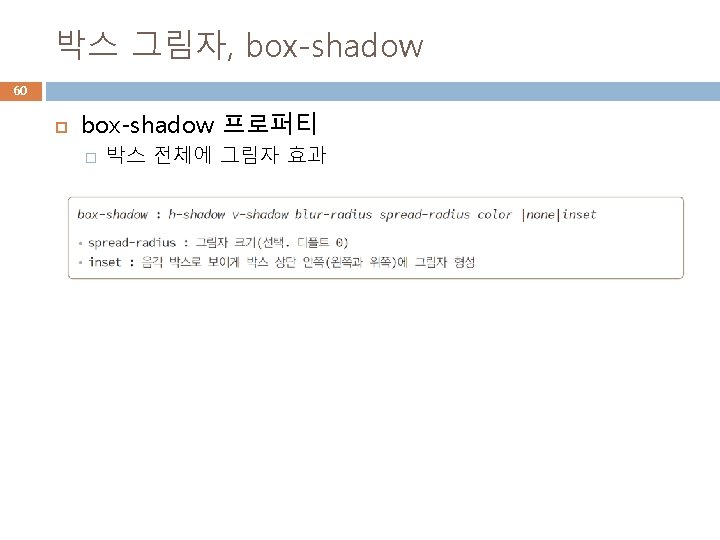

예제 4– 20 box-shadow로 박스 그림자 만들기 61 <!DOCTYPE html> <head> <title>div 박스에 그림자 만들기</title> <style>. red. Box { box-shadow : 10 px red; }. blur. Box { box-shadow : 10 px 5 px sky. Blue; }. multi. Effect { box-shadow : 2 px 2 px black, 0 0 25 px blue, 0 0 5 px darkblue; } <body> div { <h 3>박스 그림자 만들기</h 3> width : 150 px; <hr> height : 70 px; <div class="red. Box">뚱이와 함께</div> padding : 10 px; <div class="blur. Box">뚱이와 함께</div> border : 10 px solid lightgray; <div class="multi. Effect">뚱이와 함께</div> background-image : </body> url("media/spongebob. png"); </html> background-size : 150 px 100 px; background-repeat : no-repeat; } </style> </head>
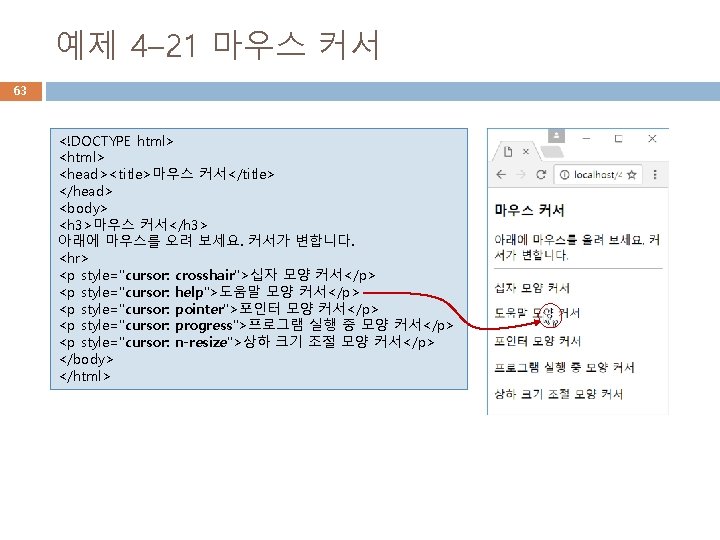
- Slides: 63