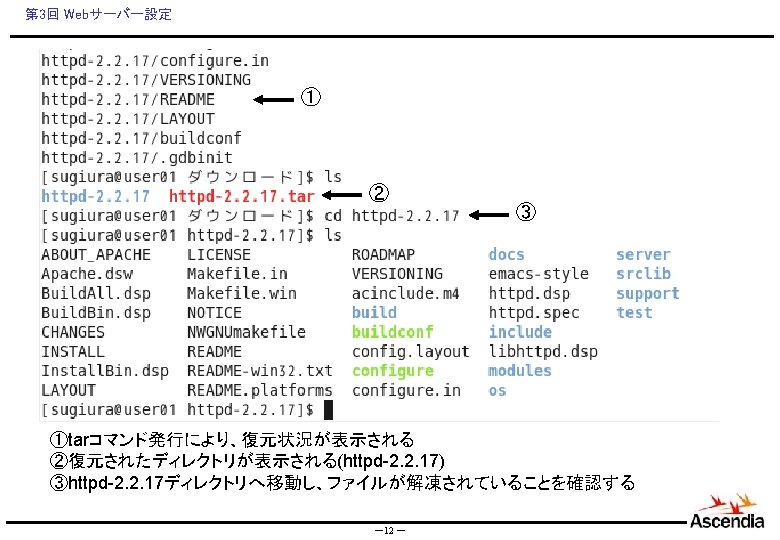
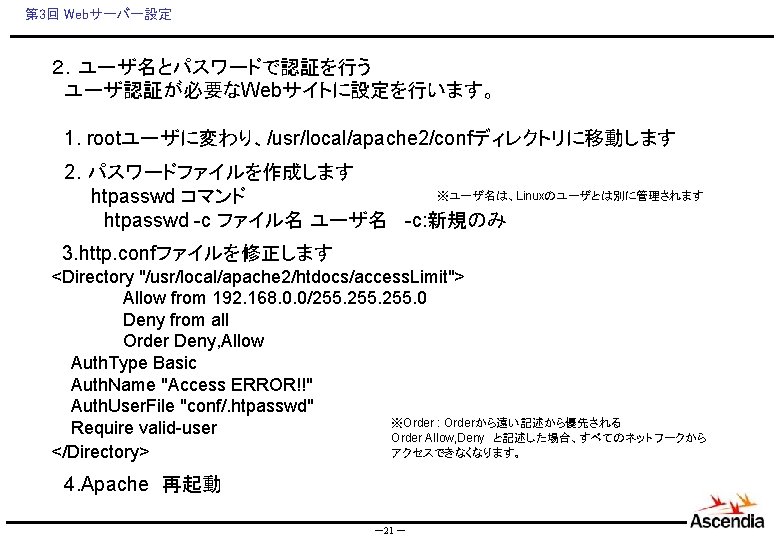
3 Web Apache httpd conf 1 usrlocalapache 2conf


 1.ネットワークアクセス制限の設定 httpd. confファイルで設定します 1. /usr/local/apache 2/conf/へ移動 2. httpd. confファイルを修正 <Directory")
第 3回 Webサーバー設定 Apacheの設定(応用編) 1.ネットワークアクセス制限の設定 httpd. confファイルで設定します 1. /usr/local/apache 2/conf/へ移動 2. httpd. confファイルを修正 <Directory "/usr/local/apache 2/htdocs/access. Limit"> Allow from 192. 168. 0. 0/255. 0 Deny from all Order Deny, Allow </Directory> -20 -


第 3回 Webサーバー設定 ステータスコードの応じたページのカスタマイズ httpd. confファイル設定 347 # 348 # Customizable error responses come in three flavors: 349 # 1) plain text 2) local redirects 3) external redirects 350 # 351 # Some examples: 352 #Error. Document 500 "The server made a boo. " ① 353 Error. Document 404 /missing. html 354 #Error. Document 404 "/cgi-bin/missing_handler. pl" 355 #Error. Document 402 http: //www. example. com/subscription_info. html 356 # ①HTTPステータスコード 404(ページが見つからない)の場合、missing. htmlを 表示させる設定 -23 -

第 3回 Webサーバー設定 演習問題1 下記の構成でApcheの設定を行いましょう。 認証OK Member Check 認証リンク http: //localhost/login. html ユーザID パスワード http: //localhost/access. Limit/index. html 認証NG 認証に失敗しました! http: //localhost/401. html -24 -


第 3回 Webサーバー設定 ログの設定は httpd. conf ファイルで行います。 Access. Log 207 208 Log. Format "%h %l %u %t "%r" %>s %b "%{Referer}i" "%{User-Agent}i"" combined Log. Format "%h %l %u %t "%r" %>s %b" common 216 217 218 219 220 221 222 # The location and format of the access logfile (Common Logfile Format). # If you do not define any access logfiles within a <Virtual. Host> # container, they will be logged here. Contrariwise, if you *do* # define per-<Virtual. Host> access logfiles, transactions will be # logged therein and *not* in this file. # Custom. Log "logs/access_log" common ※設定する項目によって、logファイルの 肥大化が発生しますので、注意が必要です! -27 -

![第 3回 Webサーバー設定 Error. Log [Sat Feb 26 11: 23: 50 2011] [error] [client](http://slidetodoc.com/presentation_image_h/258366b1282e6f011e61b5886b9b1eff/image-29.jpg "第 3回 Webサーバー設定 Error. Log [Sat Feb 26 11: 23: 50 2011] [error] [client")
第 3回 Webサーバー設定 Error. Log [Sat Feb 26 11: 23: 50 2011] [error] [client 127. 0. 0. 1] user sdf not found: /access. Limit, referer: http: //localhost/login. html [Sat Feb 26 11: 26: 58 2011] [notice] caught SIGTERM, shutting down [Sat Feb 26 11: 27: 00 2011] [notice] SSL FIPS mode disabled [Sat Feb 26 11: 27: 00 2011] [warn] Init: Session Cache is not configured [hint: SSLSession. Cache] [Sat Feb 26 11: 27: 00 2011] [notice] SSL FIPS mode disabled [Sat Feb 26 11: 27: 00 2011] [notice] Apache/2. 2. 17 (Unix) mod_ssl/2. 2. 17 Open. SSL/1. 0. 0 a-fips configured -resuming normal operations [Sat Feb 26 11: 27: 12 2011] [error] [client 127. 0. 0. 1] user ds not found: /access. Limit/, referer: http: //localhost/login. html [Sat Feb 26 15: 32: 10 2011] [notice] caught SIGTERM, shutting down [Sat Feb 26 15: 32: 17 2011] [notice] SSL FIPS mode disabled [Sat Feb 26 15: 32: 17 2011] [warn] Init: Session Cache is not configured [hint: SSLSession. Cache] [Sat Feb 26 15: 32: 17 2011] [notice] SSL FIPS mode disabled [Sat Feb 26 15: 32: 17 2011] [notice] Apache/2. 2. 17 (Unix) mod_ssl/2. 2. 17 Open. SSL/1. 0. 0 a-fips configured -resuming normal operations [Sat Feb 26 15: 32: 33 2011] [error] [client 127. 0. 0. 1] File does not exist: /usr/local/apache 2/htdocs/favicon. ico [Sat Feb 26 15: 32: 45 2011] [error] [client 127. 0. 0. 1] user sugiura: authentication failure for "/access. Limit/": Password Mismatch, referer: http: //localhost/login. html [Sat Feb 26 15: 34: 42 2011] [error] [client 127. 0. 0. 1] File does not exist: /usr/local/apache 2/htdocs/favicon. ico [Sat Feb 26 15: 34: 48 2011] [error] [client 127. 0. 0. 1] File does not exist: /usr/local/apache 2/htdocs/user. Access -29 -


第 3回 Webサーバー設定 2.httpd. conf ファイル設定 Webalizerページが表示できるように設定します。 # Webalizer設定 Alias /webalizer /var/www/usage <Location /webalizer> Order deny, allow Deny from all Allow from 127. 0. 0. 1 Allow from : : 1 </Location> 3.webalizer. confファイル設定 /etc/webalizer. confを設定します。 #Log. File Log. File /var/log/httpd/access_log /usr/local/apache 2/logs/access_log 4.Apache再起動 -35 -

第 3回 Webサーバー設定 5.動作確認 http: //localhost/webalizer/index. html -36 -


第 3回 Webサーバー設定 ・インストール. /config make install ・opensslのライブラリにパスを通します echo "/usr/local/ssl/lib" >> /etc/ld. so. conf ・設定を反映します ldconfig [root@user 01 etc]# echo "/usr/local/ssl/lib" >> /etc/ld. so. conf [root@user 01 etc]# ldconfig [root@user 01 etc]# -41 -

第 3回 Webサーバー設定 ②秘密鍵の作成 1. confディレクトリに移動します cd /usr/local/apache 2/conf/ 2. 秘密鍵作成コマンドの発行 openssl genrsa -des 3 1024 > secret. key genrsa: RSA形式の秘密鍵の作成 -des 3: des 3方式で暗号 1024 : 1024バイトの鍵を生成 secret. key : 秘密鍵名 [root@user 01 conf]# openssl genrsa -des 3 1024 > secret. key Generating RSA private key, 1024 bit long modulus. . . ++++++ e is 65537 (0 x 10001) Enter pass phrase: Verifying - Enter pass phrase: [root@user 01 conf]# 秘密鍵を覗いてみましょう! -42 -
![第 3回 Webサーバー設定 ③CSRファイルの作成 [root@user 01 conf]# openssl req -new -text -out webcsr. pem](http://slidetodoc.com/presentation_image_h/258366b1282e6f011e61b5886b9b1eff/image-43.jpg "第 3回 Webサーバー設定 ③CSRファイルの作成 [root@user 01 conf]# openssl req -new -text -out webcsr. pem")
第 3回 Webサーバー設定 ③CSRファイルの作成 [root@user 01 conf]# openssl req -new -text -out webcsr. pem -keyout secret. key Generating a 2048 bit RSA private key. . . +++. . . . . . . . . +++ writing new private key to 'secret. key' Enter PEM pass phrase: Verifying - Enter PEM pass phrase: ----You are about to be asked to enter information that will be incorporated into your certificate request. What you are about to enter is what is called a Distinguished Name or a DN. There are quite a few fields but you can leave some blank For some fields there will be a default value, If you enter '. ', the field will be left blank. ----Country Name (2 letter code) [XX]: State or Province Name (full name) []: Locality Name (eg, city) [Default City]: oita Organization Name (eg, company) [Default Company Ltd]: oita Organizational Unit Name (eg, section) []: ac Common Name (eg, your name or your server's hostname) []: user 01. oita-u. testsv. ac. jp Email Address []: Please enter the following 'extra' attributes to be sent with your certificate request A challenge password []: パスワードを入力 An optional company name []: [root@user 01 conf]# -43 -

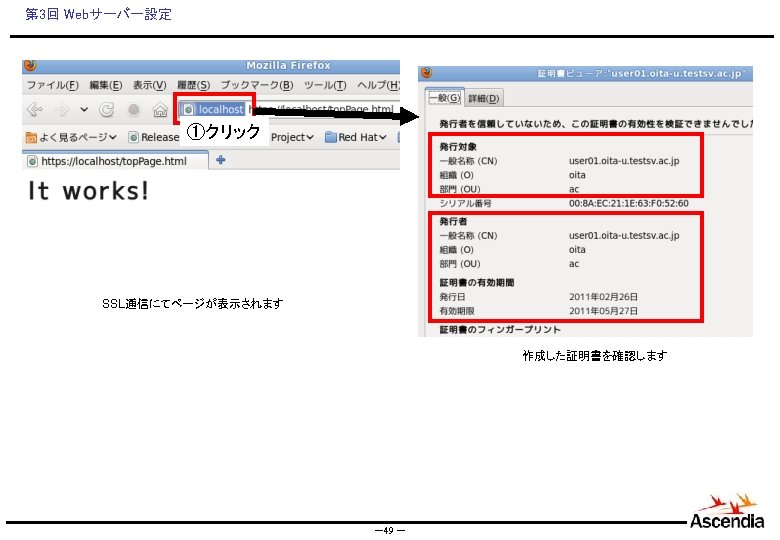
第 3回 Webサーバー設定 ④自己署名証明書 運用では、SSL認証局へCSRファイルを提出し、サーバー証明書を発行する のですが、テスト運用・限られたネットワークのみでの運用として自己署名 証明書を作成します。 openssl x 509 -in webcsr. pem -out server. crt -req -signkey secret. key -days 90 [root@user 01 conf]# openssl x 509 -in webcsr. pem -out server. crt -req -signkey secret. key -days 90 Signature ok subject=/C=XX/L=oita/OU=ac/CN=user 01. oita-u. testsv. ac. jp Getting Private key Enter pass phrase for secret. key: パスワードを入力 [root@user 01 conf]# ls extra httpd. conf. org mime. types secret. key user. Extra httpd. conf magic original server. cert webcsr. pem [root@user 01 conf]# -44 -
 connections")
第 3回 Webサーバー設定 ⑤サーバー証明書を適用 Apache設定ファイルの修正 1. httpd. confの設定 422 # Secure (SSL/TLS) connections 423 Include conf/extra/httpd-ssl. conf ←コメントをはずします 424 # 2. /conf/extra/httpd-ssl. confファイルの設定 92 # Server Certificate: 93 # Point SSLCertificate. File at a PEM encoded certificate. If 94 # the certificate is encrypted, then you will be prompted for a 95 # pass phrase. Note that a kill -HUP will prompt again. Keep 96 # in mind that if you have both an RSA and a DSA certificate you 97 # can configure both in parallel (to also allow the use of DSA 98 # ciphers, etc. ) 99 SSLCertificate. File "/usr/local/apache 2/conf/server. crt" 100 #SSLCertificate. File "/usr/local/apache 2/conf/server-dsa. crt" 101 102 # Server Private Key: 103 # If the key is not combined with the certificate, use this 104 # directive to point at the key file. Keep in mind that if 105 # you've both a RSA and a DSA private key you can configure 106 # both in parallel (to also allow the use of DSA ciphers, etc. ) 107 SSLCertificate. Key. File "/usr/local/apache 2/conf/server. key" 108 #SSLCertificate. Key. File "/usr/local/apache 2/conf/server-dsa. key" -45 -
![第 3回 Webサーバー設定 3. Apache再起動 [root@user 01 conf]# /usr/local/apache 2/bin/apachectl stop [root@user 01 conf]#](http://slidetodoc.com/presentation_image_h/258366b1282e6f011e61b5886b9b1eff/image-46.jpg "第 3回 Webサーバー設定 3. Apache再起動 [root@user 01 conf]# /usr/local/apache 2/bin/apachectl stop [root@user 01 conf]#")
第 3回 Webサーバー設定 3. Apache再起動 [root@user 01 conf]# /usr/local/apache 2/bin/apachectl stop [root@user 01 conf]# /usr/local/apache 2/bin/apachectl start Apache/2. 2. 17 mod_ssl/2. 2. 17 (Pass Phrase Dialog) Some of your private key files are encrypted for security reasons. In order to read them you have to provide the pass phrases. Server www. example. com: 443 (RSA) Enter pass phrase: パスワードを入力します OK: Pass Phrase Dialog successful. [root@user 01 conf]# -46 -

- Slides: 49