3 Project File IO Web File class File

 3 Project File. IO Web. File. class File. Copy.")
디렉터리로 각 개발자의 코드 관리(패키지) 3 Project File. IO Web. File. class File. Copy. class File. RW. class Tools. class Graphic DObject. class Line. class Rect. class Circle. class UI Main. class GUI. class Event. Handler. class Tools. class 이름은 같지만 경로명이 달라 서도 다른 파일로 취급 Project/File. IO/Tools. class Project/UI/Tools. class


패키지 사용하기, import문 6 다른 패키지에 작성된 클래스 사용 import를 이용하지 않는 경우 소스 내에서 패키지 이름과 클래스 이 름의 전체 경로명을 써주어야 함 public class Import. Example { public static void main(String[] args) { java. util. Scanner scanner = new java. util. Scanner(System. in); } } import 키워드 이용하는 경우 소스의 시작 부분에 사용하려는 패키지 명시 특정 클래스의 경로명만 포함하는 경우 소스에는 클래스 명만 명시하면 됨 import java. util. Scanner; 패키지 내의 모든 클래스를 포함시키는 경우 import java. util. *; *는 현재 패키지 내의 클래스만을 의미하며 하위 패키지의 클래스까지 포함하지 않는다. import java. util. Scanner; public class Import. Example { public static void main(String[] args) { Scanner scanner = new Scanner(System. in); } } import java. util. *; public class Import. Example { public static void main(String[] args) { Scanner scanner = new Scanner(System. in); } }


 abstract class")
이클립스에서 쉽게 패키지 만들기 9 예제로 사용할 샘플 소스(5장의 예제 5 -6) abstract class Calculator { public abstract int add(int a, int b); // 두 정수의 합을 구하여 리턴 public abstract int subtract(int a, int b); // 두 정수의 차를 구하여 리턴 public abstract double average(int[] a); // 배열에 저장된 정수의 평균을 구해 실수로 리던 } class Good. Calc extends Calculator { public int add(int a, int b) { return a+b; } public int subtract(int a, int b) { return a - b; } public double average(int[] a) { double sum = 0; for (int i = 0; i < a. length; i++) sum += a[i]; return sum/a. length; } public static void main(String [] args) { Calculator c = new Good. Calc(); System. out. println(c. add(2, 3)); System. out. println(c. subtract(2, 3)); System. out. println(c. average(new int [] {2, 3, 4 })); } }

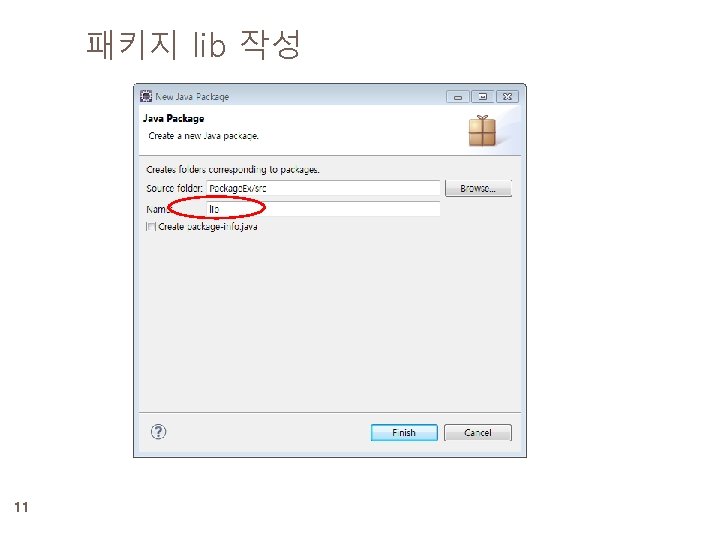


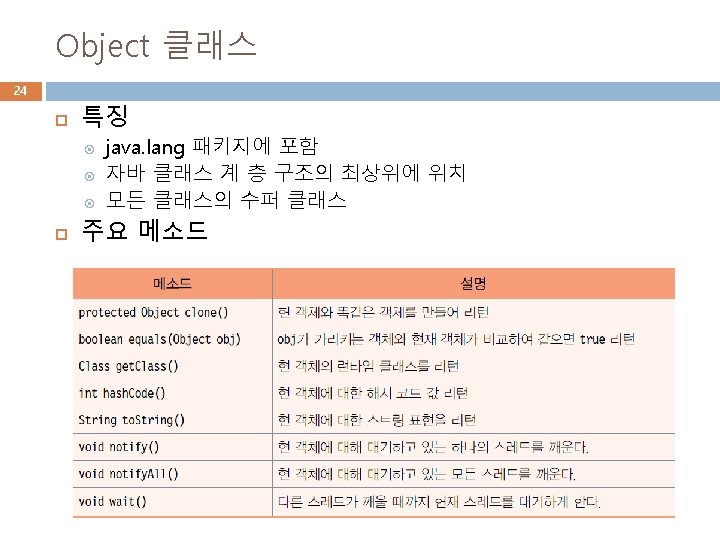
클래스 Calculator 만들기 Calculator 클래스를 public abstract 속성 으로 생성한다. 14


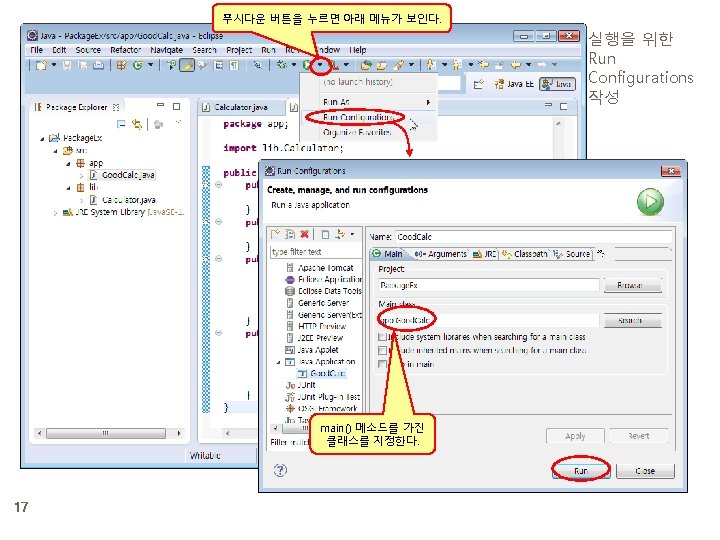

프로젝트 Package. Ex 실행 18


자바 패키지 구조 java applet awt beans io lang math net nio rmi security sql beancontext color datatransfer dnd dgc event font registry server geom instrument im image print spi renderable managemen t acl cert ref channel s charset spi reflect spe c interfaces concurre nt 21 util spi annotation activation text atomic locks jar loggin g prefs regex spi zip
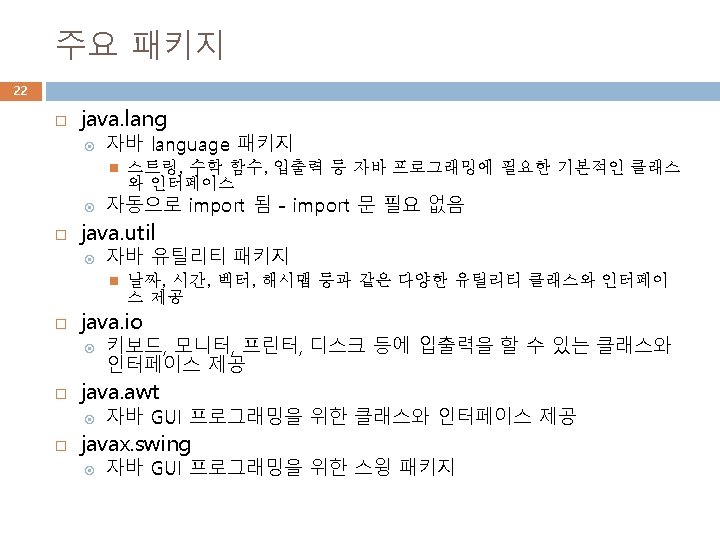
에서")
자바 API 참조 23 자바 API의 상세 정보 Oracle Technology Network(http: //docs. oracle. com/javase/8/docs/api/)에서 온라인제공
")
객체 속성 25 class Point { int x, y; public Point(int x, int y) { this. x = x; this. y = y; } } public class Object. Property { public static void main(String [] args) { Point p = new Point(2, 3); System. out. println(p. get. Class(). get. Name()); System. out. println(p. hash. Code()); System. out. println(p. to. String()); System. out. println(p); } } Point 12677476 Point@c 17164
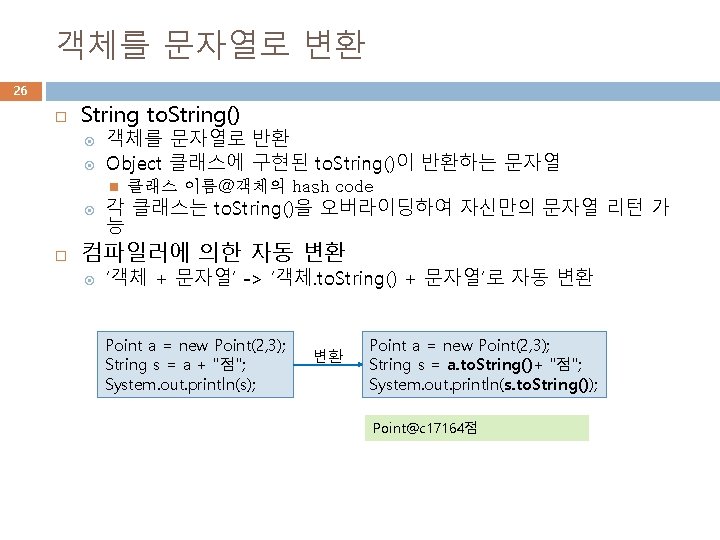
 만들기 27 class Point { int x, y; } public Point(int")
새로운 to. String() 만들기 27 class Point { int x, y; } public Point(int x, int y) { this. x = x; this. y = y; } public String to. String() { return "Point(" + x + ", " + y+ ")"; } public class Object. Property { public static void main(String [] args) { Point a = new Point(2, 3); System. out. println(a. to. String()); } } Point(2, 3) System. out. println(a); 라고 해도 동일
) 28 객체 레퍼런스의 동일성 비교 : == 연산자 이용 객체 내용")
객체 비교(==과 equals()) 28 객체 레퍼런스의 동일성 비교 : == 연산자 이용 객체 내용 비교 서로 다른 두 객체가 같은 내용물인지 비교 boolean equals(Object obj) 이용 class Point { int x, y; public Point(int x, int y) { this. x = x; this. y = y; } } Point a = new Point(2, 3); Point b = new Point(2, 3); Point c = a; if(a == b) // false System. out. println("a==b"); if(a == c) // true System. out. println("a==c"); c a x=2 y=3 Point b x=2 y=3 Point a==c class Point { int x, y; public Point(int x, int y) { this. x = x; this. y = y; } public boolean equals(Point p) { if(x == p. x && y == p. y) return true; else return false; } } Point a = new Point(2, 3); Point b = new Point(2, 3); Point c = new Point(3, 4); if(a == b) // false System. out. println("a==b"); if(a. equals(b)) // true System. out. println("a is equal to b"); if(a. equals(c)) // false System. out. println("a is equal to c"); a is equal to b a x=2 y=3 Point b x=2 y=3 Point c x=3 y=4 Point
 만들기 29 int 타입의 width, height의")
예제 6 -1 : Rect 클래스 만들고 equals() 만들기 29 int 타입의 width, height의 필드를 가지는 Rect 클래스를 작성하고, 두 Rect 객체의 width, height 필드에 의해 구성되는 면적이 같으면 두 객체가 같은 것으로 판별하도록 equals()를 작성하라. Rect 생성자에서 width, height 필드를 인자로 받아 초기화한다. class Rect { int width; int height; public Rect(int width, int height) { this. width = width; this. height = height; } public boolean equals(Rect p) { if (width*height == p. width*p. height) return true; else return false; } } public class Equals. Ex { public static void main(String[] args) { Rect a = new Rect(2, 3); Rect b = new Rect(3, 2); Rect c = new Rect(3, 4); if(a. equals(b)) System. out. println("a is equal to b"); if(a. equals(c)) System. out. println("a is equal to c"); if(b. equals(c)) System. out. println("b is equal to c"); } }a is equal to b


Wrapper 객체 생성 31 기본 타입의 값을 인자로 Wrapper 클래스 생성자 호출 Integer i = new Integer(10); Character c = new Character(‘c’); Float f = new Float(3. 14); Boolean b = new Boolean(true); 데이터 값을 나타내는 문자열을 생성자 인자로 사용 Boolean b = new Boolean(“false”); Integer I = new Integer(“ 10”); Double d = new Double(“ 3. 14”); Float는 double 타입의 값을 생성자의 인자로 사용 Float f = new Float((double) 3. 14);

;")
Wrapper 활용 33 Wrapper 객체로부터 기본 데이터 타입 알아내기 Integer i = new Integer(10); int ii = i. int. Value(); // ii = 10 Float f = new Float(3. 14); float ff = f. float. Value(); // ff = 3. 14 Character c = new Character('c' ); char cc = c. char. Value(); // cc = ’c’ Boolean b = new Boolean(true); boolean bb = b. boolean. Value(); // bb = true 문자열을 기본 데이터 타입으로 변환 int i = Integer. parse. Int("123"); // i = 123 boolean b = Boolean. parse. Boolean("true"); // b = true float f = Float. parse. Float("3. 141592" ); // f = 3. 141592 기본 데이터 타입을 문자열로 변환 String String s 1 s 2 s 3 s 4 s 5 = = = Integer. to. String(123); // 정수 123을 문자열 "123" 으로 변환 Integer. to. Hex. String(123); // 정수 123을 16진수의 문자열 "7 b"로 변환 Float. to. String(3. 141592 f); // 실수 3. 141592를 문자열 "3. 141592"로 변환 Charater. to. String('a'); // 문자 ‘a’를 문자열 "a"로 변환 Boolean. to. String(true); // 불린 값 true를 문자열 "true"로 변환

예제 6 -2 : Wrapper 클래스 활용 34 다음은 Wrapper 클래스를 활용하는 예이다. 다음 프로그램의 결과는 무엇인가? public class Wrapper. Class. Ex { public static void main(String[] args) { Integer i = new Integer(10); char c = '4'; Double d = new Double(3. 1234566); System. out. println(Character. to. Lower. Case('A')); if (Character. is. Digit(c)) System. out. println(Character. get. Numeric. Value(c)); System. out. println(Integer. parse. Int("-123")); System. out. println(Integer. to. Binary. String(28)); System. out. println(Integer. to. Hex. String(28)); System. out. println(i. double. Value()); System. out. println(d. to. String()); System. out. println(Double. parse. Double("44. 13 e-6")); } } a 4 -123 16 11100 3 1 c 10. 0 3. 1234566 4. 413 E-5


예제 6 -3 : 박싱 언박싱의 예 37 다음 코드에 대한 결과는 무엇인가? public class Auto. Boxing. Un. Boxing { public static void main(String[] args) { int i = 10; Integer int. Object = i; // auto boxing System. out. println("int. Object = " + int. Object); } } i = int. Object + 10; // auto unboxing System. out. println("i = " + i); int. Object = 10 i = 20


 문자열이 같으면 0 리턴 이 문자열이")
문자열 비교 42 int compare. To(String another. String) 문자열이 같으면 0 리턴 이 문자열이 another. String 보다 사전에 먼저 나오면 음수 리턴 이 문자열이 another. String 보다 사전에 나중에 나오면 양수 리턴 String a = "java"; String b = "jasa"; int res = a. compare. To(b); if(res == 0) System. out. println("the same"); else if(res < 0) System. out. println(a +"<"+b); else System. out. println(a +">"+b); "java" 가 "jasa" 보다 사전에 나중에 나오기 때문에 양수 리턴 java>jasa 비교 연산자 ==는 문자열 비교에는 사용할 수 없음

은 새로운 문자열을 생성 44 String s 1 = \"abcd\"; String s 2 =")
concat()은 새로운 문자열을 생성 44 String s 1 = "abcd"; String s 2 = "efgh"; s 1 = s 1. concat(s 2); s 1 abcd s 2 efgh s 1 abcdefgh abcd s 2 efgh
 문자열")
문자열 내의 공백 제거, 문자열의 각 문자 접근 45 공백 제거 String trim() 문자열 앞 뒤 공백 문자(tab, enter, space) 제거한 문자열 리턴 String a = " abcd def "; b = "txyzt"; c = a. trim(); // c = "abcd def" d = b. trim(); // d = "xyz" 문자열의 문자 char. At(int index) 문자열 내의 문자 접근 String a = "class"; char c = a. char. At(2); // c = 'a' // "class"에 포함된 ‘s’의 개수를 세는 코드 int count = 0; String a = "class"; for(int i=0; i<a. length(); i++) { // a. length()는 5 if(a. char. At(i) == 's') count++; } System. out. println(count); // 2 출력

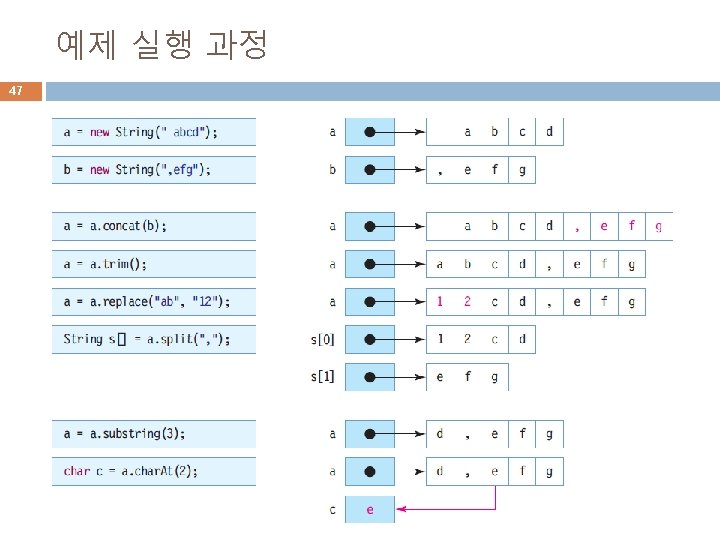
예제 6 -4 : String 클래스 메소드 활용 46 String 클래스의 다양한 메소드를 활용하는 예를 보여라. public class String. Ex { public static void main(String[] args) { String a = new String(" abcd"); String b = new String(", efg"); // 문자열 연결 a = a. concat(b); System. out. println(a); // 공백 제거 a = a. trim(); System. out. println(a); // 문자열 대치 a = a. replace("ab", "12"); System. out. println(a); // 문자열 분리 String s[] = a. split(", "); for (int i=0; i<s. length; i++) System. out. println("분리된 " + i + "번 문자열: " + s[i]); // 서브 스트링 a = a. substring(3); System. out. println(a); } } // 문자열의 문자 char c = a. char. At(2); System. out. println(c); abcd, efg 12 cd, efg 분리된 0번 문자열: 12 cd 분리된 1번 문자열: efg d, efg e

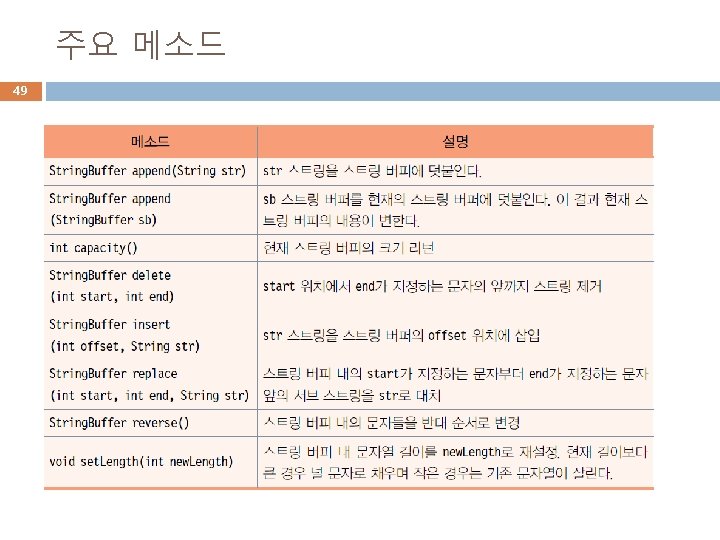

String. Buffer의 메소드 활용 예 50

예제 6 -5 : String. Buffer 클래스 메소드 활용 51 String. Buffer 클래스의 메소드를 이용하여 문자열을 조작하는 예를 보이자. 다음 코드의 실행 결과는? public class String. Buffer. Ex { public static void main(String[] args) { String. Buffer sb = new String. Buffer("This"); System. out. println(sb. hash. Code()); sb. append(" is pencil"); // 문자열 덧붙이기 System. out. println(sb); sb. insert(7, " my"); // 문자열 삽입 System. out. println(sb); sb. replace(8, 10, "your"); // 문자열 대치 System. out. println(sb); sb. set. Length(5); // 스트링 버퍼 내 문자열 길이 설정 } } System. out. println(sb); System. out. println(sb. hash. Code()); 14576877 This is pencil This is my pencil This is your pencil This 14576877

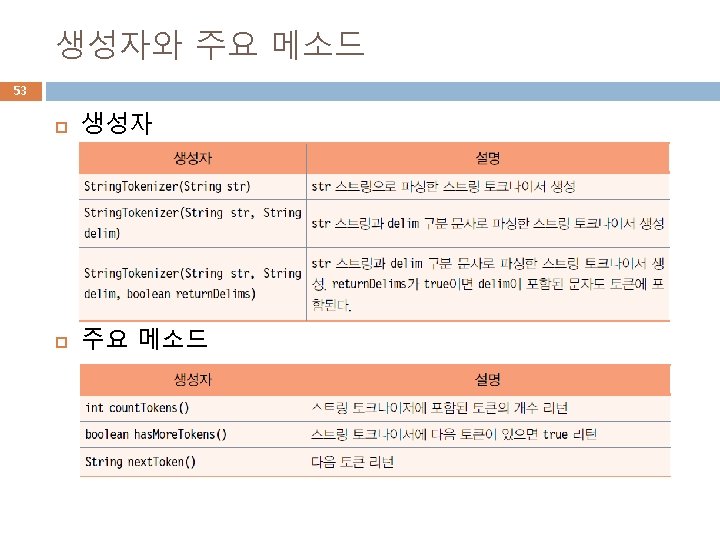
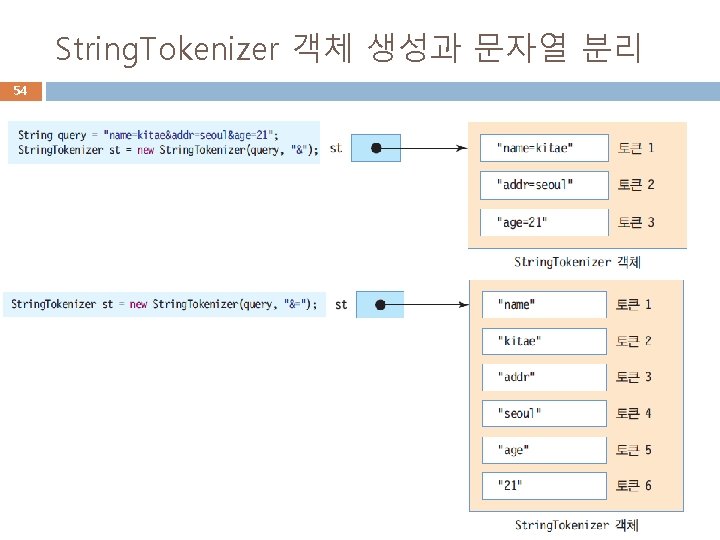

예제 6 -6 : String. Tokenizer 클래스 메소드 활용 55 “홍길동/장화/홍련/콩쥐/팥쥐”문자열을‘/’를 구분 문자로 하여 토큰을 분리하여 각 토큰을 출력하라. import java. util. String. Tokenizer; public class String. Tokenizer. Ex { public static void main(String[] args) { String. Tokenizer st = new String. Tokenizer("홍길동/장화/홍련/콩쥐/팥쥐", "/"); while (st. has. More. Tokens()) System. out. println(st. next. Token()); } } 홍길동 장화 홍련 콩쥐 팥쥐
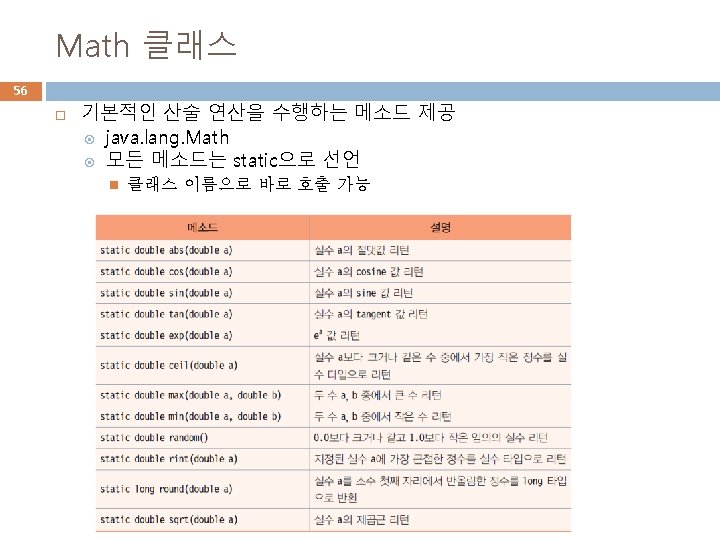


예제 6 -7 : Math 클래스 메소드 활용 58 Math 클래스의 다양한 메소드 활용 예를 보여라. public class Math. Ex { public static void main(String[] args) { double a = -2. 78987434; // 절대값 구하기 System. out. println(Math. abs(a)); System. out. println(Math. ceil(a)); // ceil System. out. println(Math. floor(a)); // floor System. out. println(Math. sqrt(9. 0)); // 제곱근 System. out. println(Math. exp(1. 5)); // exp System. out. println(Math. rint(3. 141592)); // rint } } // [1, 45] 사이의 난수 발생 System. out. print("이번주 행운의 번호는"); for (int i=0; i<5; i++) System. out. print(Math. round(1 + Math. random() * 44) + " "); System. out. println("입니다. "); 2. 78987434 -2. 0 -3. 0 4. 4816890703380645 3. 0 이번주 행운의 번호는 35 42 18 31 33
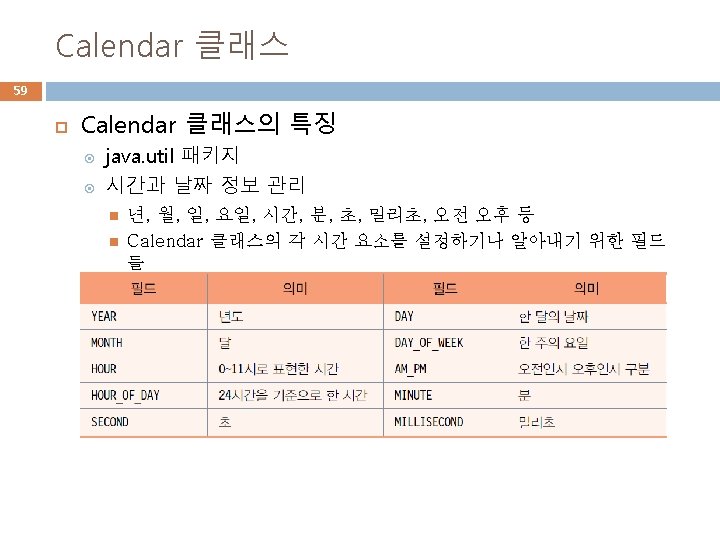


예제 6 -7 Calendar를 이용하여 현재 날짜와 시간 출력 및 설정하기 61 import java. util. Calendar; public class Calendar. Ex { public static void print. Calendar(String msg, Calendar cal) { int year = cal. get(Calendar. YEAR); // get()은 0~30까지의 정수 리턴. int month = cal. get(Calendar. MONTH) + 1; int day = cal. get(Calendar. DAY_OF_MONTH); int day. Of. Week = cal. get(Calendar. DAY_OF_WEEK); int hour = cal. get(Calendar. HOUR); int hour. Of. Day = cal. get(Calendar. HOUR_OF_DAY); int ampm = cal. get(Calendar. AM_PM); int minute = cal. get(Calendar. MINUTE); int second = cal. get(Calendar. SECOND); int millisecond = cal. get(Calendar. MILLISECOND); } public static void main(String[] args) { Calendar now = Calendar. get. Instance(); print. Calendar("현재 ", now); } } Calendar first. Date = Calendar. get. Instance(); first. Date. clear(); // 2012년 12월 25일. 12월을 표현하기 위해 month에 11로 설정 first. Date. set(2012, 11, 25); first. Date. set(Calendar. HOUR_OF_DAY, 20); // 저녁 8시 first. Date. set(Calendar. MINUTE, 30); // 30분 print. Calendar("처음 데이트한 날은 ", first. Date); System. out. print(msg + year + "/" + month + "/" + day + "/"); 현재 2012/12/27/목요일(20시)오후8시 22분 28초 889밀리초 switch(day. Of. Week) { 처음 데이트한 날은 2012/12/25/화요일(20시)오후8시 30분 0초 0밀리초 case Calendar. SUNDAY : System. out. print("일요일"); break; case Calendar. MONDAY : System. out. print("월요일"); break; case Calendar. TUESDAY : System. out. print("화요일"); break; case Calendar. WEDNESDAY : System. out. print("수요일"); break; case Calendar. THURSDAY : System. out. print("목요일"); break; case Calendar. FRIDAY: System. out. print("금요일"); break; case Calendar. SATURDAY : System. out. print("토요일"); break; } System. out. print("(" + hour. Of. Day + "시)"); if(ampm == Calendar. AM) System. out. print("오전"); else System. out. print("오후"); System. out. println(hour + "시 " + minute + "분 " + second + "초 “ + millisecond +"밀리초");
- Slides: 61