2 PMS 7003 Wiring 2 Wiring Diagram 3

")


- Slides: 11
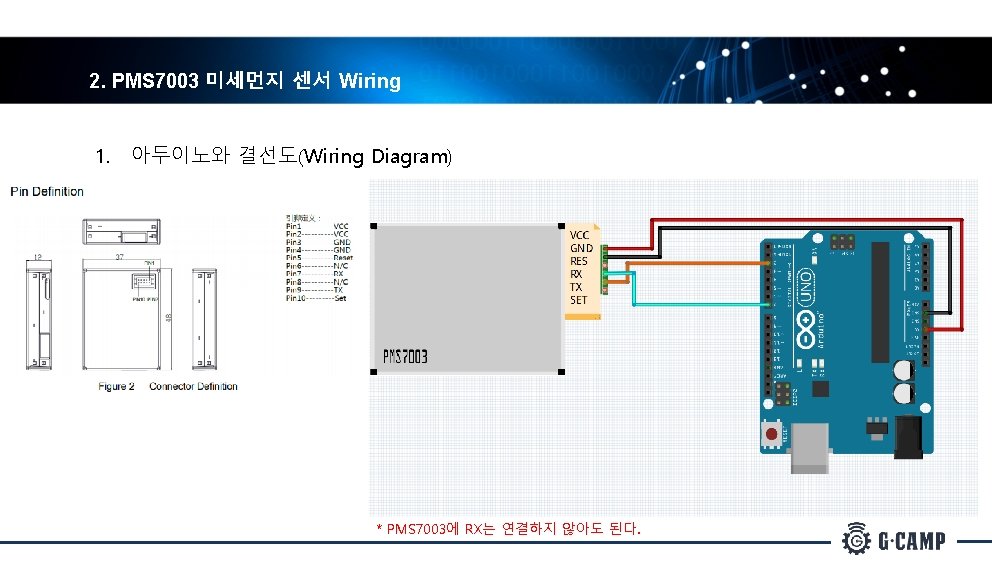
2. PMS 7003 미세먼지 센서 Wiring 2. 전체 시스템 결선도(Wiring Diagram)
3. PMS 7003 미세먼지 센서 Datasheet 살펴보기 1. Datasheet 중 Data Transport Protocol 중
4. 아두이노 코드 만들기 1. 아두이노 코드 1 #include <Software. Serial. h> //Software. Serial is for PMS 7003 module which uses serial communication Software. Serial my. Serial(2, 7); // Arudino Uno port RX, TX unsigned char pms[32]={0, }; //Variable for getting the digitally processed data from the sensor int PM 03_10=0; //Variable assigned for PM 0. 3~PM 1. 0 category int PM 10_25=0; //Variable assigned for PM 1. 0~PM 2. 5 category int PM 25_=0; //Variable assigned for PM 2. 5~PM 10 category Software. Serial. h - uart를 digital 0, 1번 이외에 활용을 위하여 Software. Serial 라이브러리 활용 my. Serial(2, 7) – 새롭게 설정한 software serial 포트 RX포트는 2번, TX포트는 7번 pms[32] – PMS 7003에서 송신하는 데이터를 1 byte char 배열 변수로 수신 저장 PM 03_10 – PM 0. 3~PM 1. 0 데이터 용 2 byte int 형 변수 선언//Atmega 보드는 int형 2 byte PM 10_25 – PM 1. 0~PM 2. 5 데이터 용 2 byte int 형 변수 선언 PM 25_ – PM 2. 5~PM 10 데이터 용 2 byte int 형 변수 선언 setup 함수 my. Serial. begin(9600); for(int i=0; i<32; i++){ pms[i]=0; } 9600 buad rate 설정 pms 배열 변수 초기화 * 아두이노 우노(그리고 다른 ATmega 기반 보드)에서 int 는 16비트(2바이트) 값을 저장한다.
4. 아두이노 코드 만들기 2. 아두이노 코드 2 loop 함수 // PMS 7003 센서로부터 데이터 수신하기 위한 변수 설정 static int Check. First=0; static int pm_add[3][5]={0, }; static int pm_old[3]={0, }; int chksum=0, res=0; ; // Software. Serial로 미세먼지 데이터 수신 if(my. Serial. available()>=32){ for(int j=0; j<32 ; j++){ pms[j]=my. Serial. read(); if(j<30) chksum+=pms[j]; } if(pms[30] != (unsigned char)(chksum>>8) || pms[31]!= (unsigned char)(chksum) ){ return res; } if(pms[0]!=0 x 42 || pms[1]!=0 x 4 d ) return res; //수신된 데이터 3가지 변수(추후 데이터 송수신에 활용)에 수정 및 저장 PM 03_10 = pms[10]<<8 | pms[11]; PM 10_25 = pms[12]<<8 | pms[13]; PM 25_ = pms[14]<<8 | pms[15]; }