2 IV 60 Computer graphics set 8 Illumination

![Open. GL Illumination example Glfloat light. Pos[] = {2. 0, 0. 0, 3. 0,](https://slidetodoc.com/presentation_image/0b03e5a9bca465d10e69eb35d45ac588/image-2.jpg "Open. GL Illumination example Glfloat light. Pos[] = {2. 0, 0. 0, 3. 0,")


: Light intensity I and reflection coefficients k: (r,")


![Atmospheric effects 2 = 0. 25 + [ 1 0. 25 ] H&B 10](https://slidetodoc.com/presentation_image/0b03e5a9bca465d10e69eb35d45ac588/image-37.jpg "Atmospheric effects 2 = 0. 25 + [ 1 0. 25 ] H&B 10")


![Open. GL Illumination Glfloat light. Pos[] = {2. 0, 0. 0, 3. 0, 0.](https://slidetodoc.com/presentation_image/0b03e5a9bca465d10e69eb35d45ac588/image-47.jpg "Open. GL Illumination Glfloat light. Pos[] = {2. 0, 0. 0, 3. 0, 0.")
; Open. GL provides")
![Open. GL Light-sources 2 Position light-source: Glfloat sunlight. Pos[] Glfloat lamplight. Pos[] = {2.](https://slidetodoc.com/presentation_image/0b03e5a9bca465d10e69eb35d45ac588/image-49.jpg "Open. GL Light-sources 2 Position light-source: Glfloat sunlight. Pos[] Glfloat lamplight. Pos[] = {2.")
![Open. GL Light-sources 3 Color light-source: Glfloat grey. Color[] = {0. 3, 1. 0};](https://slidetodoc.com/presentation_image/0b03e5a9bca465d10e69eb35d45ac588/image-50.jpg "Open. GL Light-sources 3 Color light-source: Glfloat grey. Color[] = {0. 3, 1. 0};")
; * =")

:")

: Source: the")
: Source color + alpha (RD,")


- Slides: 59
2 IV 60 Computer graphics set 8: Illumination Models and Surface-Rendering Methods Jack van Wijk TU/e
Open. GL Illumination example Glfloat light. Pos[] = {2. 0, 0. 0, 3. 0, 0. 0}; Glfloat white. Color[] = {1. 0, 1. 0}; Glfloat pink. Color[] = {1. 0, 0. 5, 1. 0}; gl. Shade. Model(GL_SMOOTH); gl. Enable(GL_LIGHTING); gl. Enable(GL_LIGHT 0); // Use smooth shading // Enable light source #0 gl. Lightfv(GL_LIGHT 0, GL_POSITION, light. Pos); // position LS 0 gl. Lightfv(GL_LIGHT 0, GL_DIFFUSE, white. Color); // set color LS 0 gl. Materialfv(GL_FRONT, GL_DIFFUSE, pink. Color); // set surface // color gl. Begin(GL_TRIANGLES); gl. Normal 3 fv(n 1); gl. Vertex 3 fv(v 1); // draw triangle, give gl. Normal 3 fv(n 2); gl. Vertex 3 fv(v 2); // first normal, followed gl. Normal 3 fv(n 3); gl. Vertex 3 fv(v 3); // by vertex gl. End(); What is going on here?
Introduction 1 Illumination model: Given a point on a surface, what is the perceived color and intensity? Known as Lighting Model, or Shading Model Surface rendering: Apply the Illumination model to color all pixels of the surface. H&B 17: 531 -532
Introduction 2 Example: • Illumination model gives color vertices, • Surface is displayed via interpolation of these colors. H&B 17: 531 -532
Introduction 3 Illumination: • Physics: – Material properties, light sources, relative positions, properties medium • Psychology: – Perception, what do we see – Color! • Often approximating models H&B 17: 531 -532
Light sources 1 Light source: object that radiates energy. Sun, lamp, globe, sky… Intensity I = (Ired , Igreen , Iblue) If Ired = Igreen = Iblue : white light H&B 17 -1: 532 -536
Light sources 2 Simple model: point light source - position P and intensity I - Light rays along straight lines - Good approximation for small light sources H&B 17 -1: 532 -536
Light sources 3 Simpler yet: point light source at infinity - Direction V and intensity I - Sunlight V H&B 17 -1: 532 -536
Light sources 4 Damping: intensity of light decreases with distance Energy is distributed over area sphere, hence Il = I / d 2, d with d distance to light source. In practice often too ‘agressive’, hence Il = I / (a 0 +a 1 d+a 2 d 2) If light source at infinity: No damping with distance H&B 17 -1: 532 -536
Light sources 5 Directed light source, spotlight: Light is primarily send in direction of Vlight. P Q a l light cone Vlight H&B 17 -1: 532 -536
Light sources 6 More subtle: Let I decrease with increasing angle a. P Q a l light cone Vlight H&B 17 -1: 532 -536
Surface illumination 1 • When light hits a surface, three things can happen: reflection absorption transmission H&B 17 -2: 536 -537
Surface illumination 2 • Suppose, a light source radiates white light, consisting of red, green and blue light. reflection absorption transmission If only red light is reflected, then we see a red surface. H&B 17 -2: 536 -537
Surface illumination 3 • Diffuse reflection: Light is uniformly reflected in all directions • Specular reflection: Light is stronger reflected in one direction. specular reflection diffuse reflection H&B 17 -2: 536 -537
Surface illumination 4 • Ambient light: light from the environment. Undirected light, models reflected light of other objects. H&B 17 -2: 536 -537
Basic illumination model 1 Basic illumination model: • Ambient light; • Point light sources; • Ambient reflection; • Diffuse reflection; • Specular reflection. H&B 17 -3: 537 -546
Basic illumination model 2 • Ambient light: environment light. Undirected light, models reflected light of other objects. H&B 17 -3: 537 -546
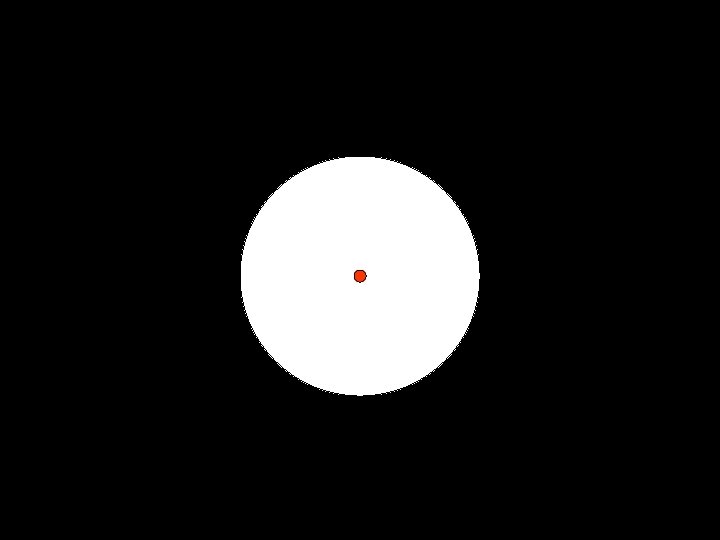
Basic illumination model 3 Perfect diffuse reflector: light is reflected uniformly in all directions. d. A/cos H&B 17 -3: 537 -546
Basic illumination model 4 Perfect diffuse reflector: light is reflected uniformly in all directions. . A Lambert’s law: d N L d. A/cos Reflected energy is proportional with cos , where denotes the angle between the normal N and a vector to the light source L. H&B 17 -3: 537 -546
Basic illumination model 5 Perfect diffuse reflector: light is reflected uniformly in all directions. Il Psource L N Psurf H&B 17 -3: 537 -546
Basic illumination model 6 Perfect specular reflector: light is only reflected in one direction. Angle of incidence is angle of reflection. N L R H&B 17 -3: 537 -546
Basic illumination model 7 Imperfect specular reflector: light is distributed in the direction of the angle of reflection, dependent on the roughness of the surface. N N L R glad ruw H&B 17 -3: 537 -546
Basic illumination model 8 Phong model: empirical model for specular reflection N L R V H&B 17 -3: 537 -546
Basic illumination model 9 Phong model: empirical model for specular reflection N L R V H&B 17 -3: 537 -546
Basic illumination model 10 Phong model: calculating the vectors L L N N. L R V H&B 17 -3: 537 -546
Basic illumination model 11 Phong model: variant with halfway vector H. Use a instead of . N L H R a V If light source and viewer far away: H constant. H&B 17 -3: 537 -546
Basic illumination model 12 All together: H&B 17 -3: 537 -546
Basic illumination model 13 Color (reprise): Light intensity I and reflection coefficients k: (r, g, b) triplets So for instance: Plastic: kd is colored (r, g, b), ks is grey (w, w, w) Metal: kd and ks same color Basic model: simple but effective. It can be done much better though… H&B 17 -3: 537 -546
Transparancy 1 Transparant object: - reflected and transmitted light - refraction - scattering H&B 17 -4: 546 -549
Transparancy 2 Snell’s law of refraction: N L i i r T R H&B 17 -4: 546 -549
Transparancy 3 Thin surface: - double refraction - shift of light ray H&B 17 -4: 546 -549
Transparancy 3 Very thin surface: - Discard shift Poor result for silhouette edges… H&B 17 -4: 546 -549
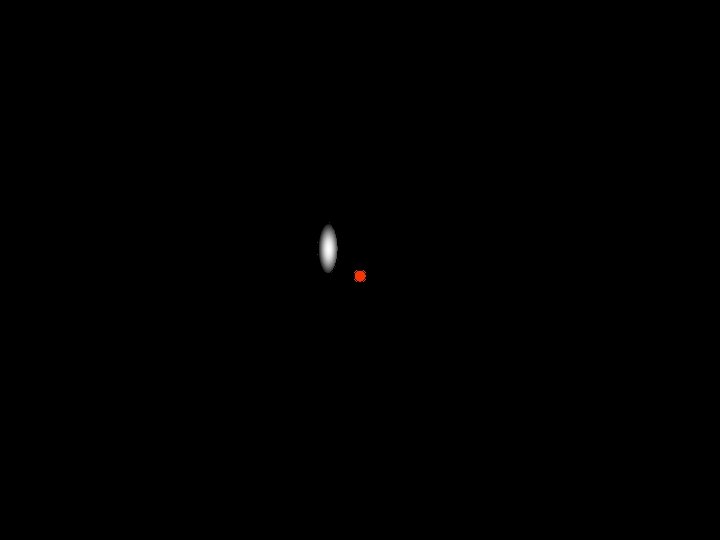
Atmospheric effects 1 Atmospheric effects: - dust, smoke, vapor - colors are dimmed - objects less well visible H&B 10 -5: 549 -550
Atmospheric effects 2 = 0. 25 + [ 1 0. 25 ] H&B 10 -5: 549 -550
Rendering polygons 1 Basic illumination model: Can be used per point, but that’s somewhat expensive More efficient: Illumination model gives color for some points; Surface is filled in using interpolation of these colors. H&B 17 -10: 559 -564
Rendering polygons 2 Constant-intensity rendering aka flat surface rendering: • Determine color for center of polygon; • Fill the polygon with a constant color. Ok if: • Object consists of planar faces, and • Light sources are far away, and • Eye point is far away, or • Polygons are about a pixel in size. H&B 17 -10: 559 -564
Rendering polygons 2 Constant-intensity rendering aka flat surface rendering: • Determine color for center of polygon; • Fill the polygon with a constant color. Highlights not visible, Facetted appearance, increased by Mach banding effect. H&B 17 -10: 559 -564
Mach banding • Human perception: edges are given emphasis, contrast is increased near edges. Angel (2000) H&B 17 -10: 559 -564
Rendering polygons 2 Gouraud surface rendering: • Determine average normal on vertices; • Determine color for vertices; • Interpolate the colors per polygon (incrementally). N 2 N 1 N 4 V N 3 H&B 17 -10: 559 -564
Rendering polygons 3 Gouraud surface rendering: • Much better result for curved surfaces • Errors near highlights • Linear interpolation still gives Mach banding • Silhouettes are still not smooth Gouraud Flat
Rendering polygons 4 Phong surface rendering: • Determine average normal per vertex; • Interpolate normals per polygon (incrementally); • Calculate color per pixel. Fast Phong surface rendering: Like Phong surface rendering, but use 2 nd order approximation of color over polygon: H&B 17 -10: 559 -564
Rendering polygons 5 Phong surface rendering: • Even better result for curved surfaces • No errors at high lights • No Mach banding • Silhouettes remain coarse • More expensive than flat or Gouraud shading H&B 17 -10: 559 -564
Rendering polygons 5 Flat Gouraud Phong H&B 17 -10: 559 -564
Open. GL Illumination Glfloat light. Pos[] = {2. 0, 0. 0, 3. 0, 0. 0}; Glfloat white. Color[] = {1. 0, 1. 0}; Glfloat pink. Color[] = {1. 0, 0. 5, 1. 0}; gl. Shade. Model(GL_SMOOTH); gl. Enable(GL_LIGHTING); gl. Enable(GL_LIGHT 0); // Use smooth shading // Enable light source #0 gl. Lightfv(GL_LIGHT 0, GL_POSITION, light. Pos); // position LS 0 gl. Lightfv(GL_LIGHT 0, GL_DIFFUSE, white. Color); // set color LS 0 gl. Materialfv(GL_FRONT, GL_DIFFUSE, pink. Color); // set surface // color gl. Begin(GL_TRIANGLES); gl. Normal 3 fv(n 1); gl. Vertex 3 fv(v 1); // draw triangle, give gl. Normal 3 fv(n 2); gl. Vertex 3 fv(v 2); // first normal, followed gl. Normal 3 fv(n 3); gl. Vertex 3 fv(v 3); // by vertex gl. End(); H&B 17 -11: 564 -574
Open. GL Light-sources 1 First, enable lighting in general: gl. Enable(GL_LIGHTING); Open. GL provides (at least) eight light-sources: light. Name = GL_LIGHT 0, GL_LIGHT 1, … , GL_LIGHT 7 Enable the one(s) you need with: gl. Enable(light. Name); Set properties with gl. Light*(light. Name, light. Property, property. Value); * = i, f, iv, or fv (i: integer, f: float, v vector) H&B 17 -11: 564 -574
Open. GL Light-sources 2 Position light-source: Glfloat sunlight. Pos[] Glfloat lamplight. Pos[] = {2. 0, 0. 0, 3. 0, 0. 0}; = {2. 0, 0. 0, 3. 0, 1. 0}; gl. Lightfv(GL_LIGHT 1, GL_POSITION, sunlight. Pos); gl. Lightfv(GL_LIGHT 2, GL_POSITION, lamplight. Pos); • Fourth coordinate = 0: source at infinity • Fourth coordinate = 1: local source • Specified in world-coordinates, according to the current Model. View specification – just like geometry. Hence, take care when you specify the position. • Light from above looks more natural H&B 17 -11: 564 -574
Open. GL Light-sources 3 Color light-source: Glfloat grey. Color[] = {0. 3, 1. 0}; Glfloat pink. Color[] = {1. 0, 0. 7, 1. 0}; Glfloat white. Color[] = {1. 0, 1. 0}; gl. Lightfv(GL_LIGHT 1, GL_AMBIENT, grey. Color); gl. Lightfv(GL_LIGHT 1, GL_DIFFUSE, pink. Color); gl. Lightfv(GL_LIGHT 1, GL_SPECULAR, white. Color); • Open. GL light-source has three color properties, dependent on reflection surface. Not realistic, can be used for special effects. • If you don’t have ambient light, things often appear black. • Colors are always 4 -vectors here: Fourth coordinate is alpha. Most cases: set it to 1. 0. H&B 17 -11: 564 -574 • More settings: See book
Open. GL Global Lighting Global parameters: gl. Light. Model*(param. Name, param. Value); * = i, f, iv, or fv (i: integer, f: float, v vector) Global ambient light: Glfloat global. Ambient[] = {0. 3, 1. 0}; gl. Light. Modelfv(GL_LIGHT_MODEL_AMBIENT, global. Ambient); More precise specular reflection, take view position into account: gl. Light. Model. I(GL_LIGHT_MODEL_LOCAL_VIEWER, GL_TRUE); Two-sided lighting: gl. Light. Model. I(GL_LIGHT_MODEL_TWO_SIDE, GL_TRUE); H&B 17 -11: 564 -574
Open. GL Surface properties 1 Surface reflection parameters: gl. Material*(surf. Face, surf. Property, property. Value); * = i, f, iv, or fv (i: integer, f: float, v vector) surf. Face = GL_FRONT, GL_BACK, or GL_FRONT_AND_BACK Glfloat emission. Color[] Glfloat diffuse. Color[] Glfloat specular. Color[] = {0. 2, 0. 3, 0. 1, 1. 0}; = {0. 6, 0. 3, 0. 1, 1. 0}; = {0. 1, 1. 0}; gl. Materialfv(GL_FRONT, GL_EMISSION, gl. Materialfv(GL_FRONT, GL_DIFFUSE, gl. Materialfv(GL_FRONT, GL_SPECULAR, gl. Materialf(GL_FRONT, GL_SHININESS, emission. Color); diffuse. Color); specular. Color); 25. 0 f); H&B 17 -11: 564 -574
Open. GL Surface properties 2 If colors are changed often (for instance, per vertex): gl. Enable(GL_COLOR_MATERIAL); gl. Color. Material(GL_FRONT_AND_BACK, GL_AMBIENT_AND_DIFFUSE); gl. Begin(…); for i =. . . for j =. . . gl. Color 3 f(red(i, j), green(i, j), blue(i, j)); gl. Vertex 3 f(x(i, j), y(i, j), z(i, j)); gl. End(…); H&B 17 -11: 564 -574
Open. GL Surface properties 3 Transparent surfaces: • First, draw all opaque surfaces; • Next, draw transparent surfaces, back to front*, using something like: gl. Color 4 f(R, G, B, A); // A: alpha, for instance 0. 40 gl. Enable(GL_BLEND); gl. Blend. Func(GL_ONE_MINUS_SRC_ALPHA, GL_SRC_ALPHA); . . . Draw transparent surfaces. gl. Disable(GL_BLEND); * Open. GL cannot automatically handle transparency, because of the z-buffer algorithm used for hidden surface removal. More on this later. H&B 17 -11: 564 -574
Open. GL Surface properties 4 Color Blending (see also H&B: 135 -136): Source: the new graphics object to be drawn; Destination: the current image built up. (RS, GS, BS, AS): Source color + alpha (RD, GD, BD, AD): Destination color + alpha (SR, SG, SB, SA): Source blending factors (DR, DG, DB, DA): Destination blending factors Components of Source and Destination are weighted and added: (SRRS+ DRRD, SGGS+ DGGD, SBBS+ DBBD, SAAS+ DAAD) is stored in the current image. H&B 17 -11: 564 -574
Open. GL Surface properties 5 (RS, GS, BS, AS): Source color + alpha (RD, GD, BD, AD): Destination color + alpha (SR, SG, SB, SA): Source blending factors (DR, DG, DB, DA): Destination blending factors gl. Blend. Func(s. Factor, d. Factor): specify the blending factors. gl. Blend. Func(GL_ONE_MINUS_SRC_ALPHA, GL_SRC_ALPHA); // Use alpha of source as transparency gl. Blend. Func(GL_SRC_ALPHA, GL_ONE_MINUS_SRC_ALPHA); // Use alpha of source as opacity More options available for special effects. H&B 17 -11: 564 -574
Open. GL Surface-Rendering 1 specify the rendering method m = GL_FLAT or m = GL_SMOOTH (Gouraud, default) Ny, Nz) : specify the normal vector gl. Shade. Model(m): gl. Normal*(Nx, Flat version: Smooth version: gl. Normal 3 fv(n. V); gl. Begin(GL_TRIANGLES); gl. Vertex 3 fv(V 1); gl. Vertex 3 fv(V 2); gl. Vertex 3 fv(V 3); gl. End(); gl. Begin(GL_TRIANGLES); gl. Normal 3 fv(n. V 1); gl. Vertex 3 fv(V 1); gl. Normal 3 fv(n. V 2); gl. Vertex 3 fv(V 2); gl. Normal 3 fv(n. V 3); gl. Vertex 3 fv(V 3); gl. End(); H&B 17 -11: 564 -574
Open. GL Surface-Rendering 2 specify the rendering method m = GL_FLAT or m = GL_SMOOTH (Gouraud, default) Ny, Nz) : specify the normal vector gl. Shade. Model(m): gl. Normal*(Nx, gl. Enable(GL_NORMALIZE): Let Open. GL normalize the normals for you. And, also take care of effects of scaling, shearing, etc. H&B 17 -11: 564 -574
Next • Now that we know how to render curved surfaces, let’s study how to define these…