1 DRAWING LINES AND LETTERS Drawing Lines and
- Slides: 41

1 DRAWING LINES AND LETTERS Drawing Lines and Letters

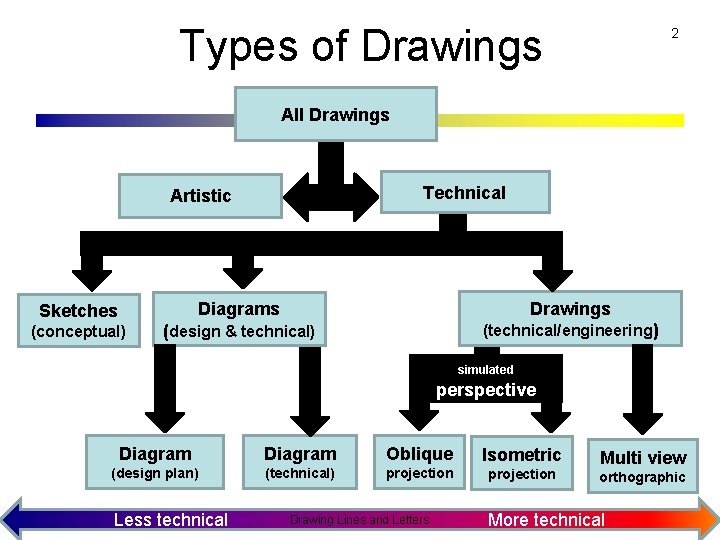
Types of Drawings 2 All Drawings Technical Artistic Sketches (conceptual) Diagrams Drawings (design & technical) (technical/engineering) simulated perspective Diagram Oblique Isometric (design plan) (technical) projection Multi view orthographic Drawing Lines and Letters Less technical More technical

3 Sketching • When you first get an idea for something you want to build you may draw it roughly, without using instruments or accurate scales. • Allows an idea to be expressed quickly in graphic form • Is prepared free-hand (without drawing instruments) • Is not done to scale, but it respects the rules of technical drawing as much as possible, and is made roughly proportional to the object represented. Drawing Lines and Letters

4 Technical Drawings • Serve as a reference to workers, architects or machinists. • Presents all the information necessary for the object’s construction. • Is made with great precision. • Requires the use of rulers, compass and protractor or drafting software. • Is done to scale, and respects the proportions of the object represented. • Respects conventions in the mode of the representation. Drawing Lines and Letters

5 Difference: • Sketch: made without drafting tools. . . Just pencil and paper. Scale is approximate, not accurate, but the sketch should still look like the object. • Drawing: made with drafting tools. . . Ruler, set squares, protractor and compass. Scale should be accurate and the drawing carefully made. Drawing Lines and Letters

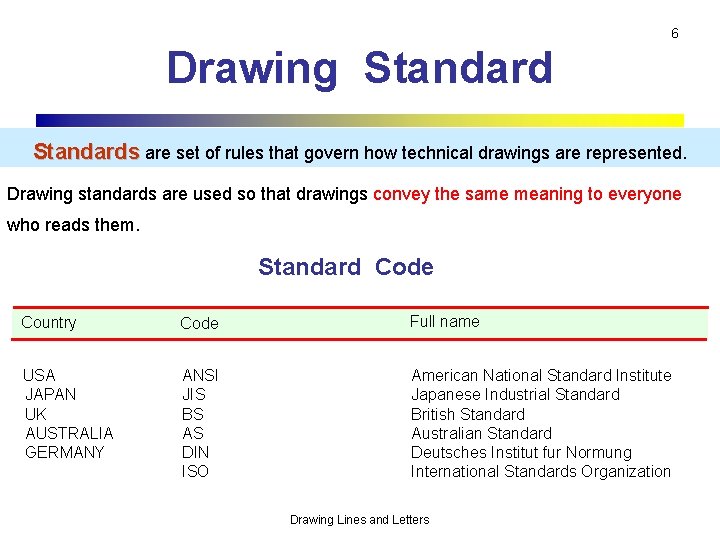
6 Drawing Standards are set of rules that govern how technical drawings are represented. Drawing standards are used so that drawings convey the same meaning to everyone who reads them. Standard Code Country USA JAPAN UK AUSTRALIA GERMANY Code ANSI JIS BS AS DIN ISO Full name American National Standard Institute Japanese Industrial Standard British Standard Australian Standard Deutsches Institut fur Normung International Standards Organization Drawing Lines and Letters

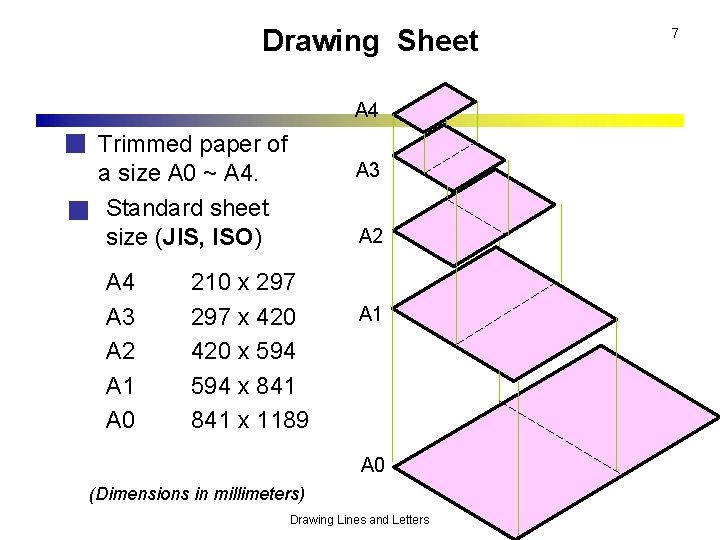
Drawing Sheet A 4 Trimmed paper of a size A 0 ~ A 4. Standard sheet size (JIS, ISO) A 4 A 3 A 2 A 1 A 0 A 3 A 2 210 x 297 x 420 x 594 x 841 x 1189 A 1 A 0 (Dimensions in millimeters) Drawing Lines and Letters 7

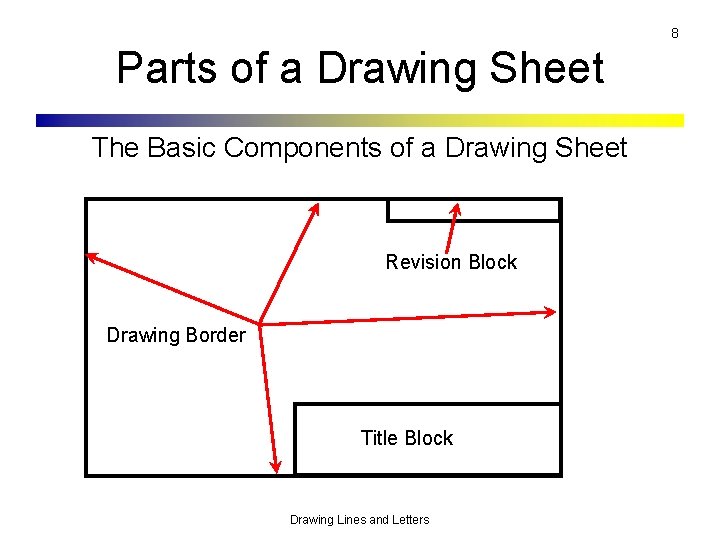
8 Parts of a Drawing Sheet The Basic Components of a Drawing Sheet Revision Block Drawing Border Title Block Drawing Lines and Letters

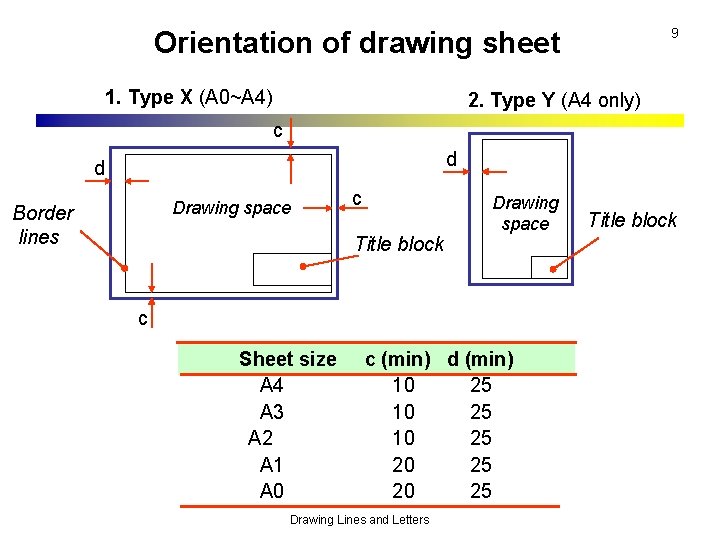
9 Orientation of drawing sheet 1. Type X (A 0~A 4) 2. Type Y (A 4 only) c d d Drawing space Border lines c Title block Drawing space c Sheet size A 4 A 3 A 2 A 1 A 0 c (min) d (min) 10 25 20 25 Drawing Lines and Letters Title block

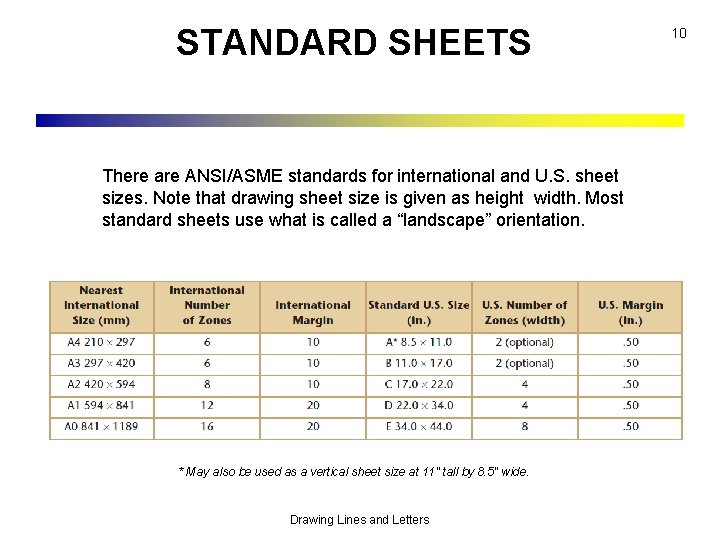
STANDARD SHEETS There are ANSI/ASME standards for international and U. S. sheet sizes. Note that drawing sheet size is given as height width. Most standard sheets use what is called a “landscape” orientation. * May also be used as a vertical sheet size at 11" tall by 8. 5" wide. Drawing Lines and Letters 10

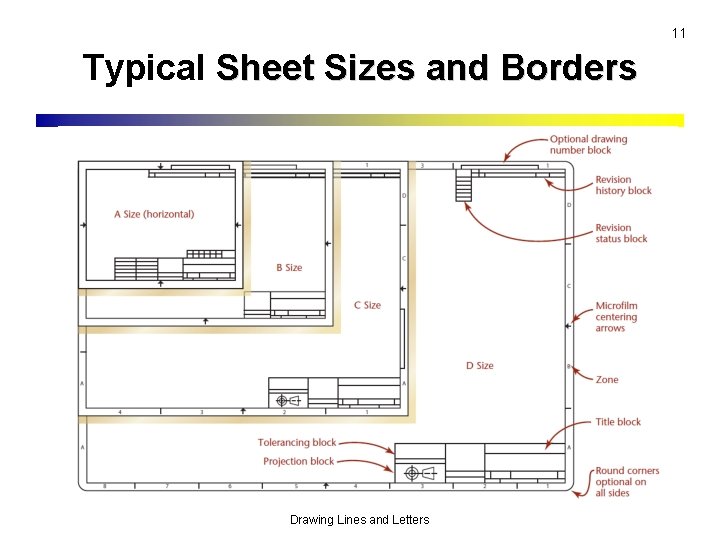
11 Typical Sheet Sizes and Borders Drawing Lines and Letters

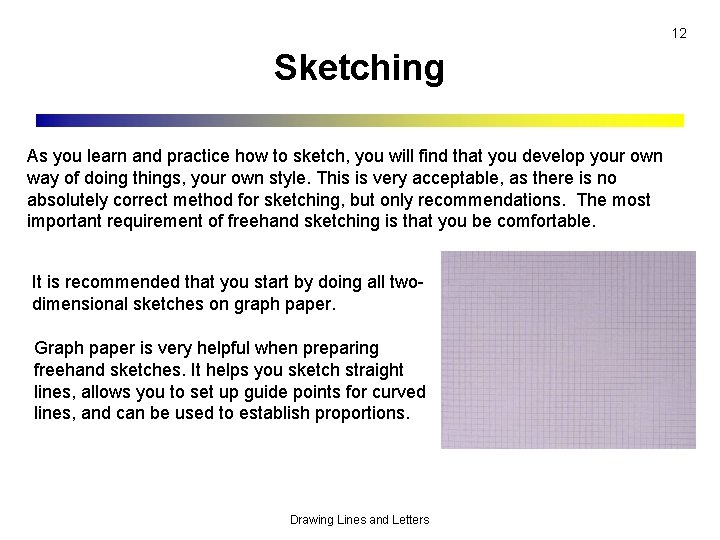
12 Sketching As you learn and practice how to sketch, you will find that you develop your own way of doing things, your own style. This is very acceptable, as there is no absolutely correct method for sketching, but only recommendations. The most important requirement of freehand sketching is that you be comfortable. It is recommended that you start by doing all twodimensional sketches on graph paper. Graph paper is very helpful when preparing freehand sketches. It helps you sketch straight lines, allows you to set up guide points for curved lines, and can be used to establish proportions. Drawing Lines and Letters

13 Sketching Straight Line Today almost Sketches should be proportional. A square should look like a square, and a every rectangle like a rectangle. Graph paper is very helpful in sketching drawing is proportionally. made using a computer. 1. Hold the pencil naturally. 2. Spot the beginning and end points. 3. Swing the pencil back and forth between the points, barely touching the paper until the direction is clearly established. 4. Draw the line firmly with a free and easy wrist-and-arm motion. Drawing Lines and Letters

14 Sketching Steps in Sketching 1. Block in main shape. 2. Locate the features. 3. Sketch arcs and circles. 4. Sketch lines. Drawing Lines and Letters

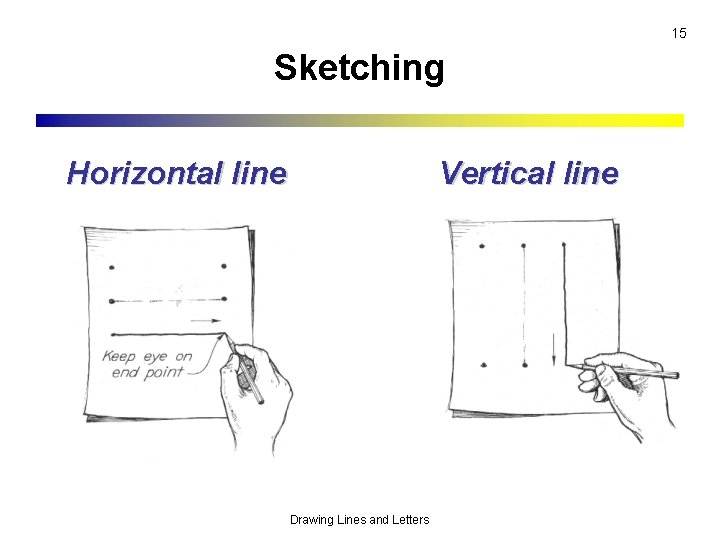
15 Sketching Vertical line Horizontal line Drawing Lines and Letters

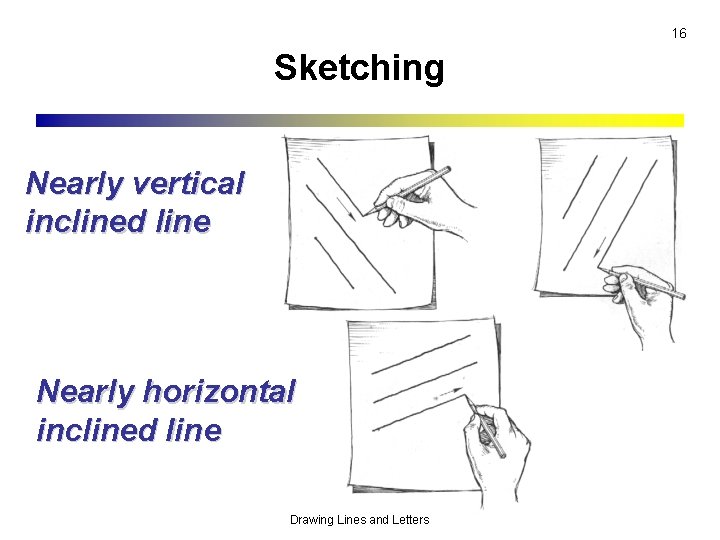
16 Sketching Nearly vertical inclined line Nearly horizontal inclined line Drawing Lines and Letters

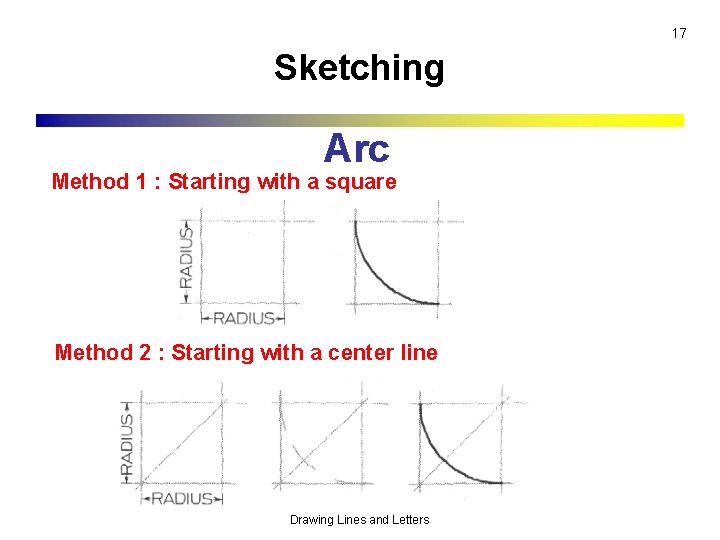
17 Sketching Arc Method 1 : Starting with a square Method 2 : Starting with a center line Drawing Lines and Letters

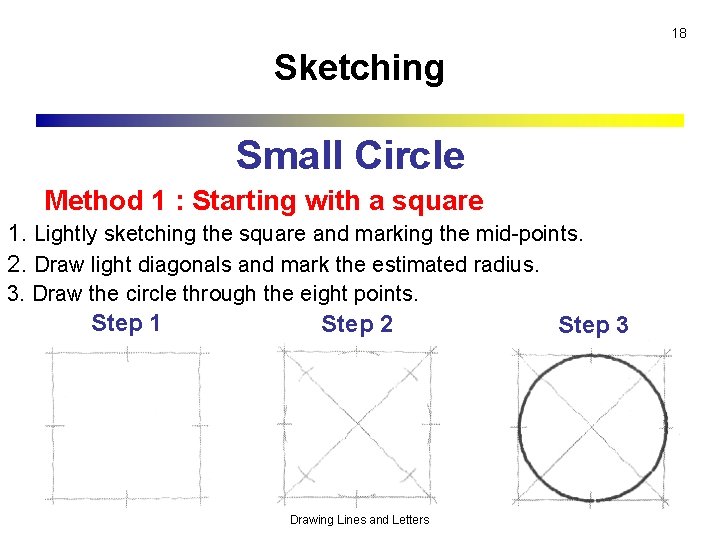
18 Sketching Small Circle Method 1 : Starting with a square 1. Lightly sketching the square and marking the mid-points. 2. Draw light diagonals and mark the estimated radius. 3. Draw the circle through the eight points. Step 1 Step 2 Drawing Lines and Letters Step 3

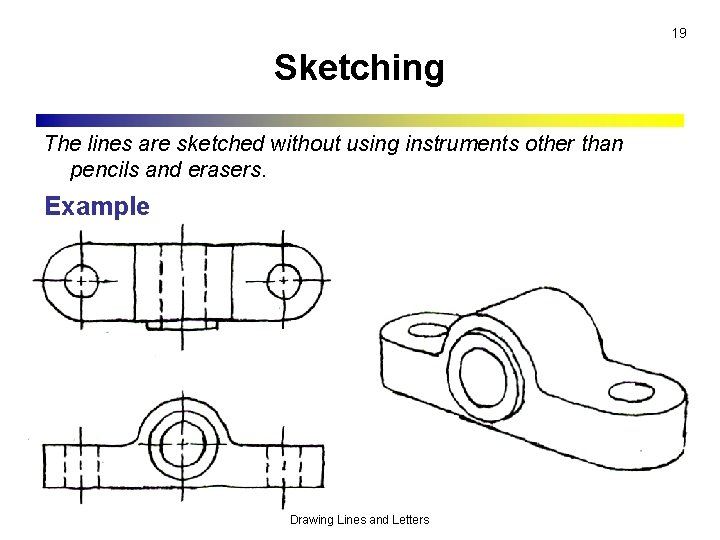
19 Sketching The lines are sketched without using instruments other than pencils and erasers. Example Drawing Lines and Letters

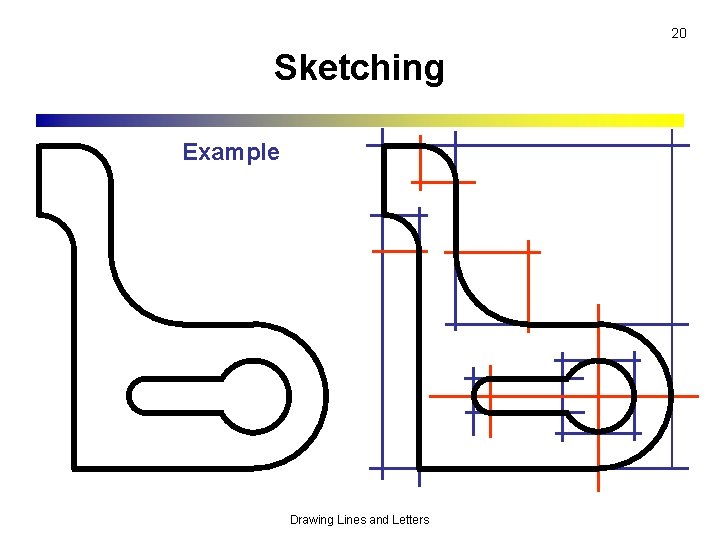
20 Sketching Example Drawing Lines and Letters

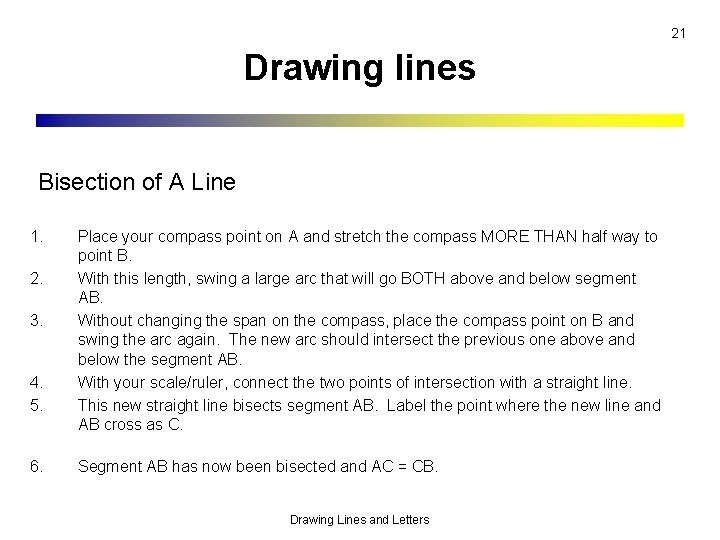
21 Drawing lines Bisection of A Line 1. 2. 3. 4. 5. 6. Place your compass point on A and stretch the compass MORE THAN half way to point B. With this length, swing a large arc that will go BOTH above and below segment AB. Without changing the span on the compass, place the compass point on B and swing the arc again. The new arc should intersect the previous one above and below the segment AB. With your scale/ruler, connect the two points of intersection with a straight line. This new straight line bisects segment AB. Label the point where the new line and AB cross as C. Segment AB has now been bisected and AC = CB. Drawing Lines and Letters

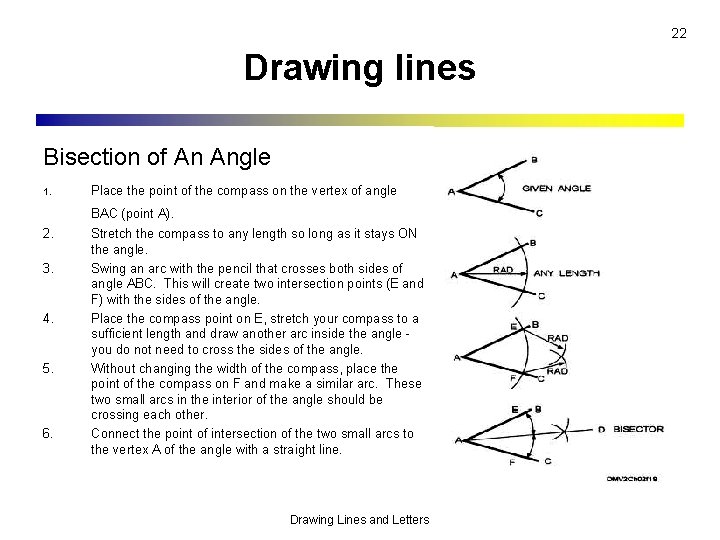
22 Drawing lines Bisection of An Angle 1. Place the point of the compass on the vertex of angle BAC (point A). 2. 3. 4. 5. 6. Stretch the compass to any length so long as it stays ON the angle. Swing an arc with the pencil that crosses both sides of angle ABC. This will create two intersection points (E and F) with the sides of the angle. Place the compass point on E, stretch your compass to a sufficient length and draw another arc inside the angle - you do not need to cross the sides of the angle. Without changing the width of the compass, place the point of the compass on F and make a similar arc. These two small arcs in the interior of the angle should be crossing each other. Connect the point of intersection of the two small arcs to the vertex A of the angle with a straight line. Drawing Lines and Letters

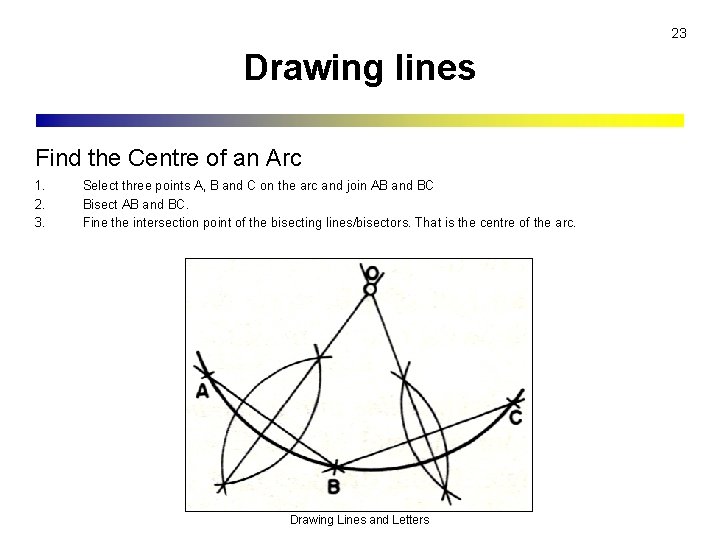
23 Drawing lines Find the Centre of an Arc 1. 2. 3. Select three points A, B and C on the arc and join AB and BC Bisect AB and BC. Fine the intersection point of the bisecting lines/bisectors. That is the centre of the arc. Drawing Lines and Letters

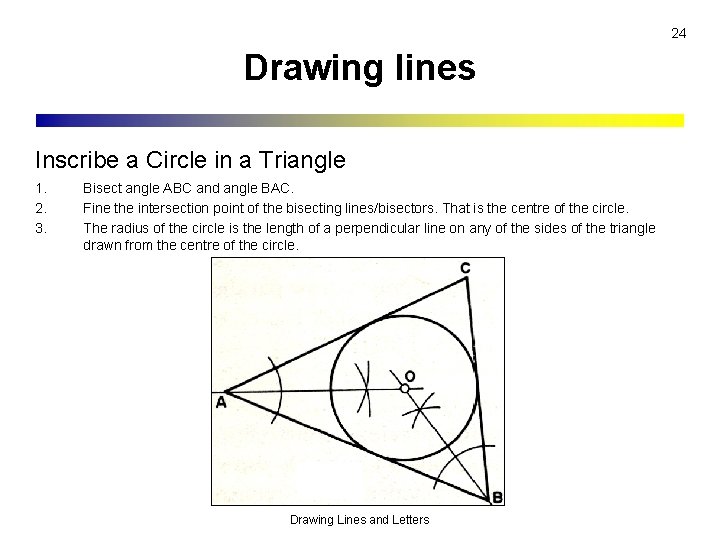
24 Drawing lines Inscribe a Circle in a Triangle 1. 2. 3. Bisect angle ABC and angle BAC. Fine the intersection point of the bisecting lines/bisectors. That is the centre of the circle. The radius of the circle is the length of a perpendicular line on any of the sides of the triangle drawn from the centre of the circle. Drawing Lines and Letters

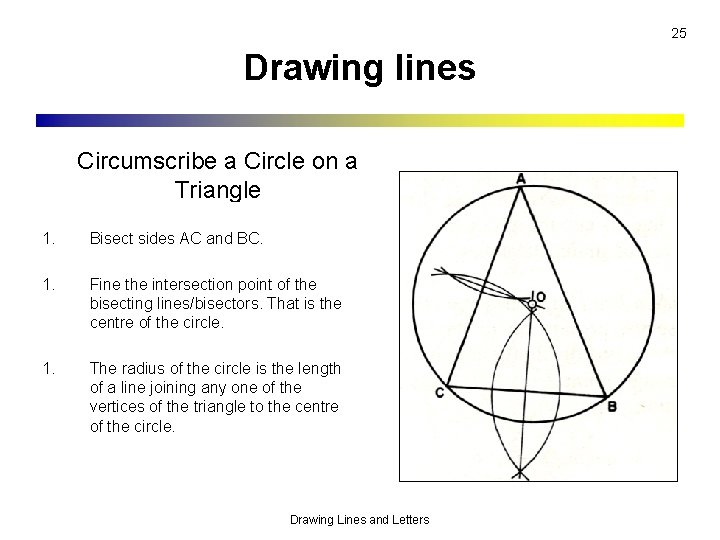
25 Drawing lines Circumscribe a Circle on a Triangle 1. Bisect sides AC and BC. 1. Fine the intersection point of the bisecting lines/bisectors. That is the centre of the circle. 1. The radius of the circle is the length of a line joining any one of the vertices of the triangle to the centre of the circle. Drawing Lines and Letters

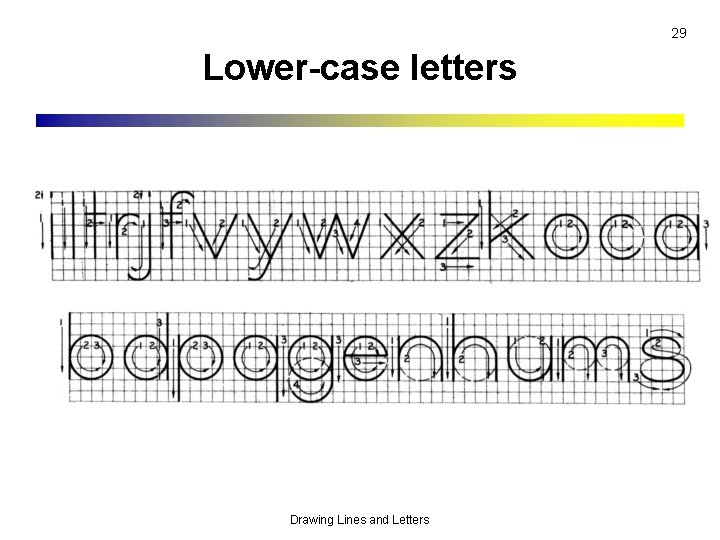
Text on Drawings 26 Text on engineering drawing is used : To communicate non graphic information. As a substitute for graphic information, in those instance where text can communicate the needed information more clearly and quickly. Thus, it must be written with Legibility Uniformity - shape - space between letters and words - size - line thickness Drawing Lines and Letters

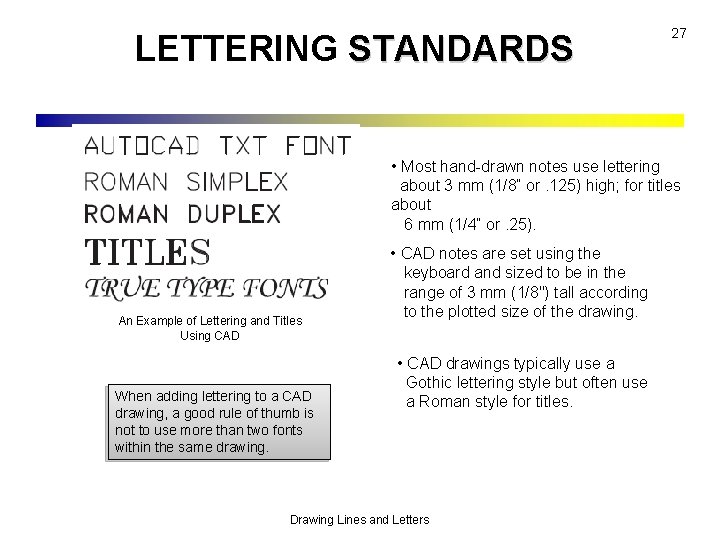
LETTERING STANDARDS 27 • Most hand-drawn notes use lettering about 3 mm (1/8” or. 125) high; for titles about 6 mm (1/4” or. 25). An Example of Lettering and Titles Using CAD When adding lettering to a CAD drawing, a good rule of thumb is not to use more than two fonts within the same drawing. • CAD notes are set using the keyboard and sized to be in the range of 3 mm (1/8") tall according to the plotted size of the drawing. • CAD drawings typically use a Gothic lettering style but often use a Roman style for titles. Drawing Lines and Letters

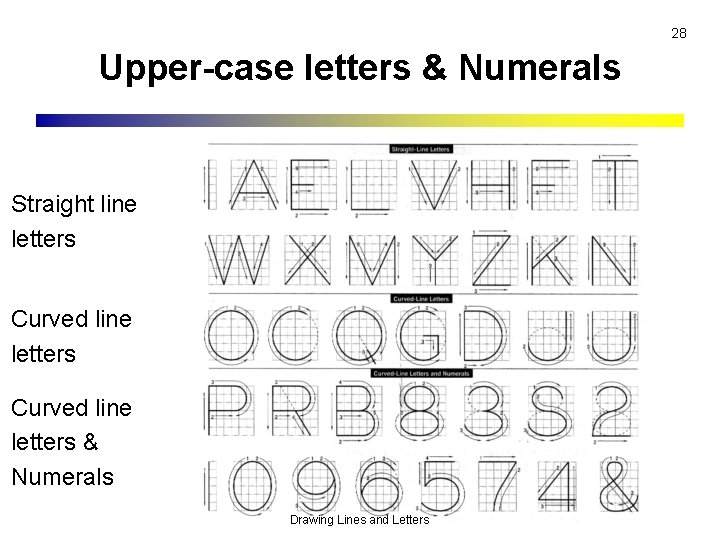
28 Upper-case letters & Numerals Straight line letters Curved line letters & Numerals Drawing Lines and Letters

29 Lower-case letters Drawing Lines and Letters

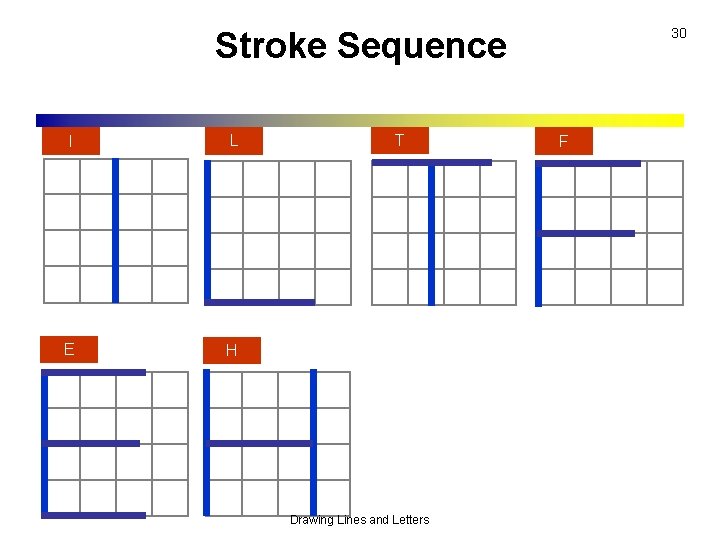
30 Stroke Sequence I L E H T Drawing Lines and Letters F

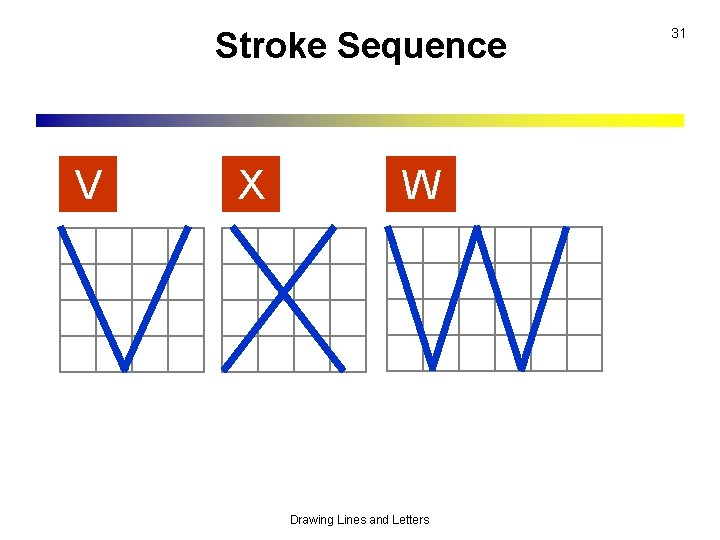
Stroke Sequence V X W Drawing Lines and Letters 31

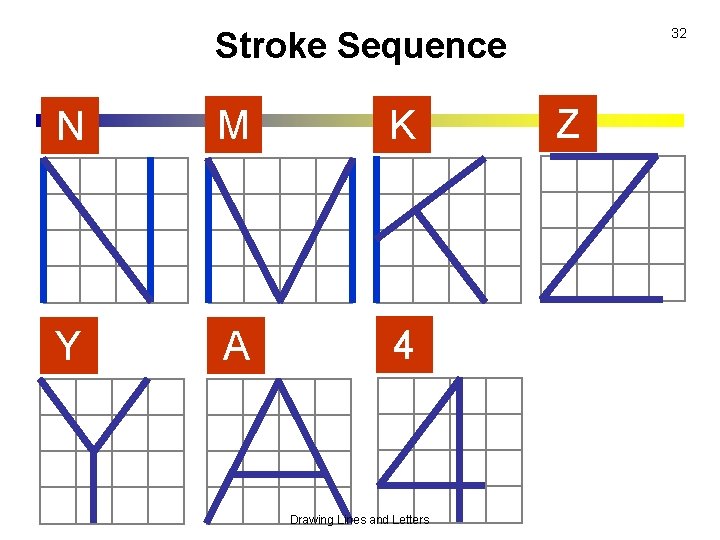
32 Stroke Sequence N M K Y A 4 Drawing Lines and Letters Z

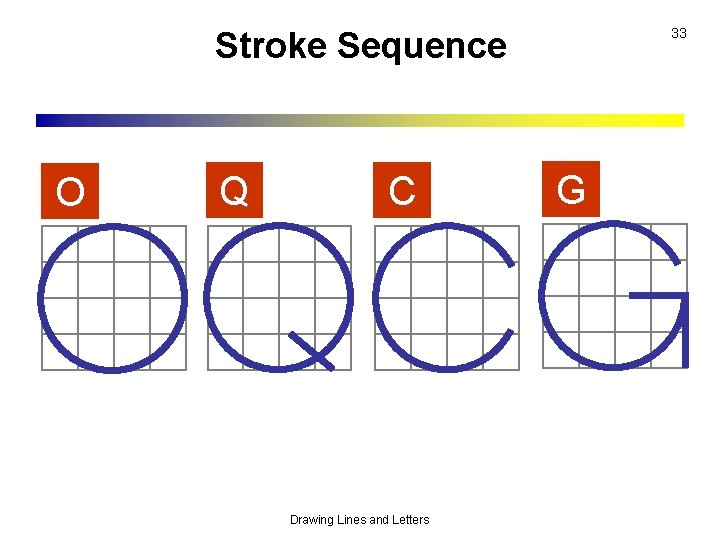
33 Stroke Sequence O Q C Drawing Lines and Letters G

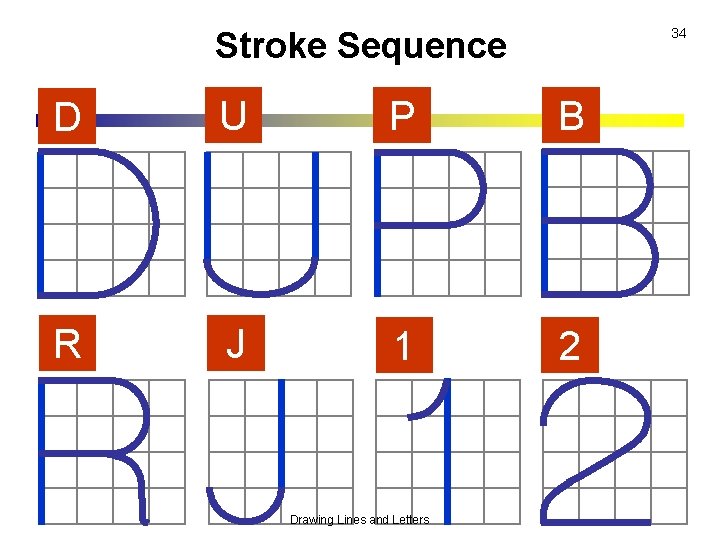
34 Stroke Sequence D U P B R J 1 2 Drawing Lines and Letters

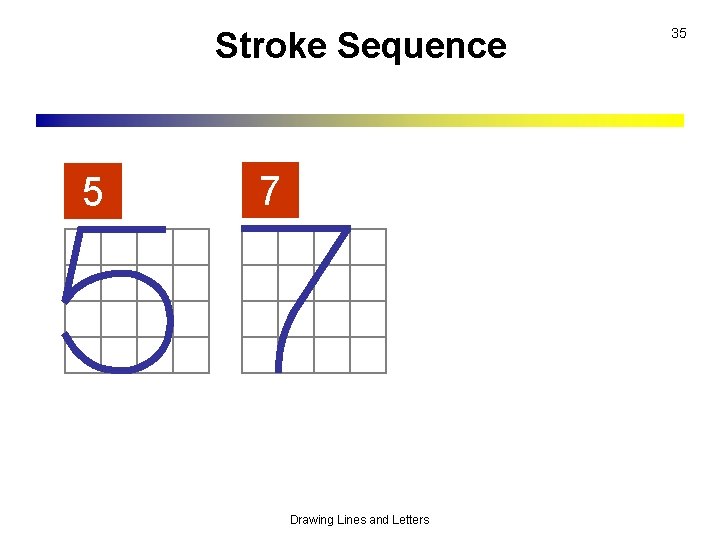
Stroke Sequence 5 7 Drawing Lines and Letters 35

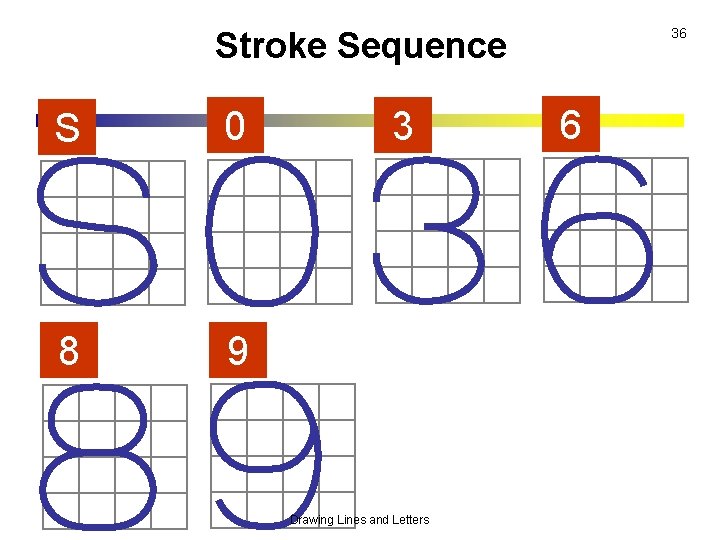
36 Stroke Sequence S 0 8 9 3 Drawing Lines and Letters 6

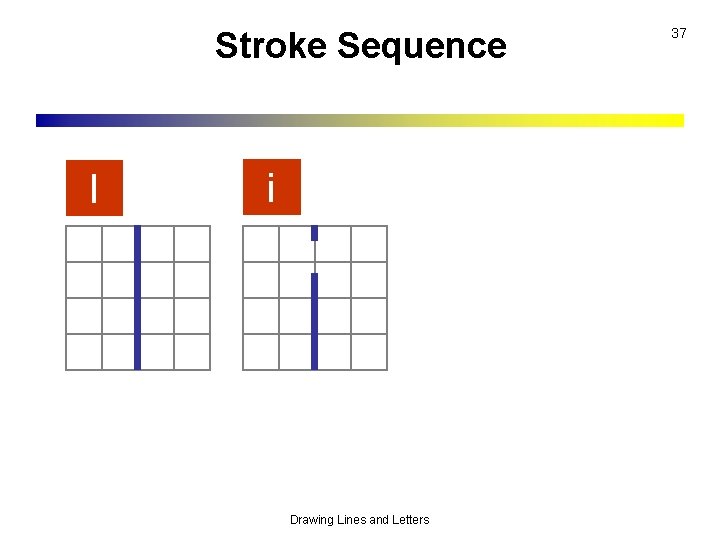
Stroke Sequence l i Drawing Lines and Letters 37

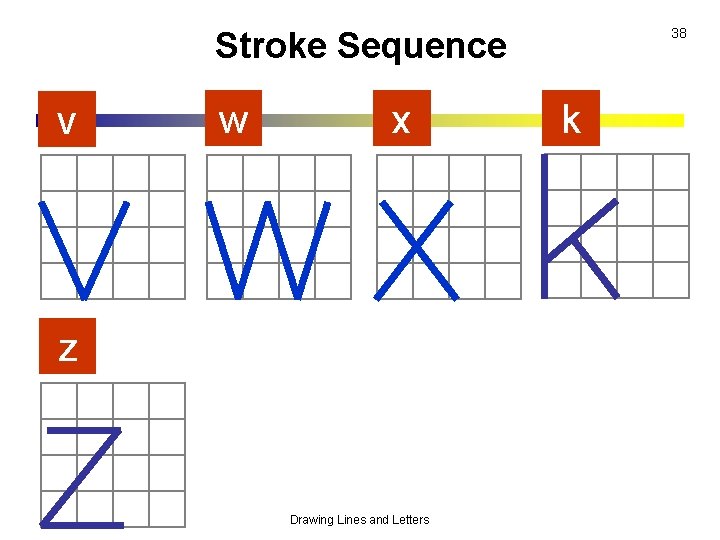
38 Stroke Sequence v w x z Drawing Lines and Letters k

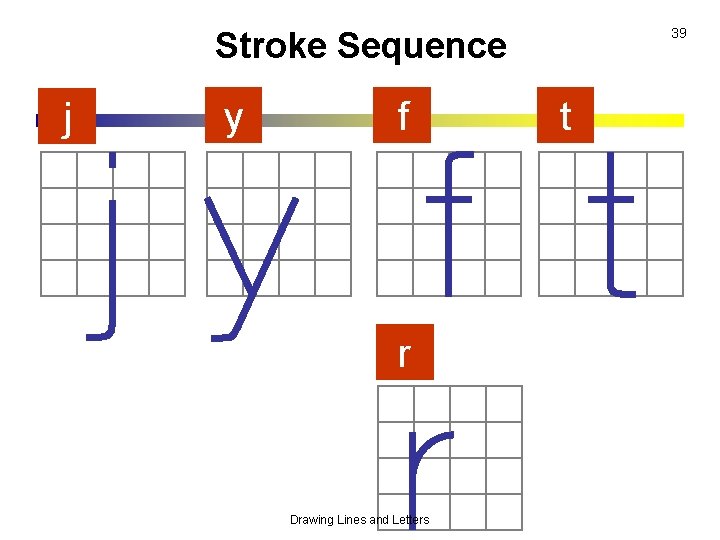
39 Stroke Sequence j y f r Drawing Lines and Letters t

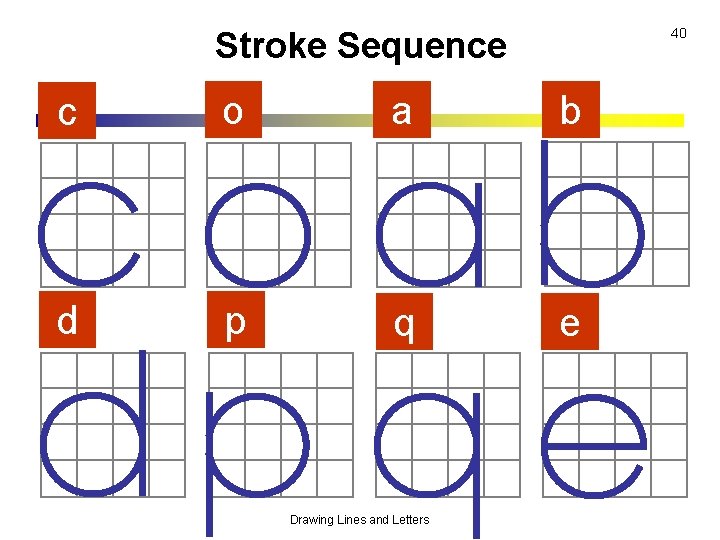
40 Stroke Sequence c o a b d p q e Drawing Lines and Letters

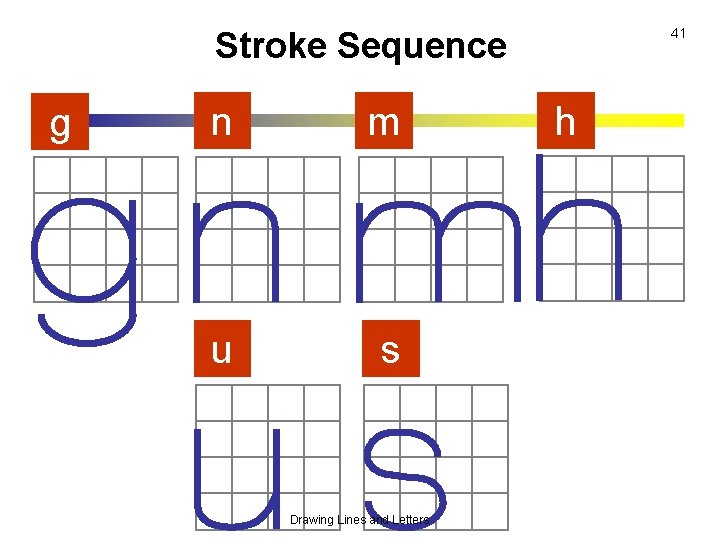
41 Stroke Sequence g n m u s Drawing Lines and Letters h