1 3 GHz Fundamental Power Coupler Mechanical Problems
1. 3 GHz Fundamental Power Coupler Mechanical Problems Experienced at FNAL Tug Arkan TTC, Beijing December 7, 2011
Acknowledgments • Ken Premo, Andrei Lunin, Cryomodule Assembly Facility (CAF) cleanroom group, Mark Champion at FNAL. • Jeff Tice, Tom Nieland, Dave Kiehl, Miguel Pinillos, Bob Kirby, Chris Adolphsen at SLAC. 12/19/2021 2
Outline • Introduction • Problems experienced at FNAL during cavity tests at the horizontal test stand • Actions taken to remedy the problems • Results • Summary 12/19/2021 3
Introduction • In order to support the ILC R&D, Fermilab will populate the ILCTA-NML test facility with five 1. 3 GHz cryomodules during the next couple of years. We procured a total of 44 fundamental power couplers (FPC) to be used on these cryomodules. • The FPCs were fabricated by a US vendor near Boston. The vendor shipped the couplers to SLAC for inspection, cleaning and high power processing. The couplers were then sent to Fermilab for installation to the cavities prior cavity testing in the horizontal test stand (HTS). • To date, 18 FPCs were sent to Fermilab and 16 HTS tests were done (15 cavities). • 2 cavities failed the HTS tests due to low gradient quench induced by field emission. During the disassembly of the cold end of the FPC, several problems were encountered with the 2 cold ends. • Several meetings were held with SLAC and several visits were done to the vendor to understand the root cause of these problems. 12/19/2021 4
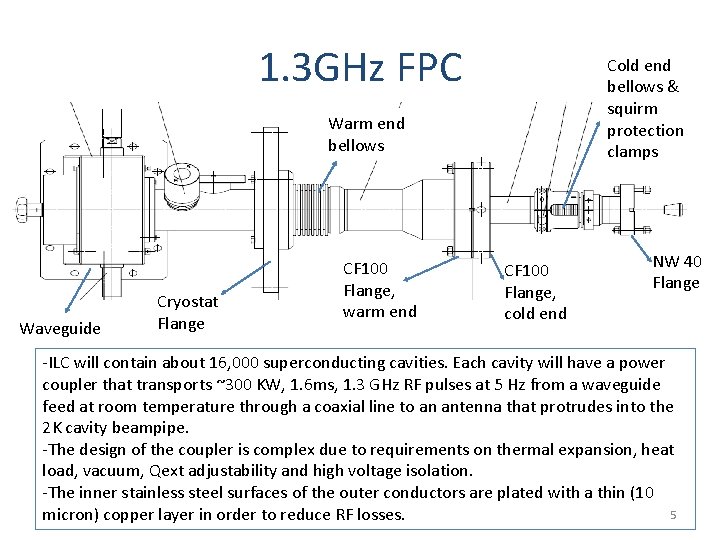
1. 3 GHz FPC Cold end bellows & squirm protection clamps Warm end bellows Waveguide Cryostat Flange CF 100 Flange, warm end CF 100 Flange, cold end NW 40 Flange -ILC will contain about 16, 000 superconducting cavities. Each cavity will have a power coupler that transports ~300 KW, 1. 6 ms, 1. 3 GHz RF pulses at 5 Hz from a waveguide feed at room temperature through a coaxial line to an antenna that protrudes into the 2 K cavity beampipe. -The design of the coupler is complex due to requirements on thermal expansion, heat load, vacuum, Qext adjustability and high voltage isolation. -The inner stainless steel surfaces of the outer conductors are plated with a thin (10 5 micron) copper layer in order to reduce RF losses.

Coupler Process Flow • Fabrication at the vendor: – TTF drawings and fabrication & QA specs developed by DESY were used for the procurement – The detailed fabrication procedures are proprietary • Inspection, Cleaning and High Power Conditioning at SLAC: – Incoming QA specs were developed based on the DESY and LAL procedures – Cleaning and assembly in Class 10 (ISO 4) cleanroom – Baking and high power conditioning 12/19/2021 6
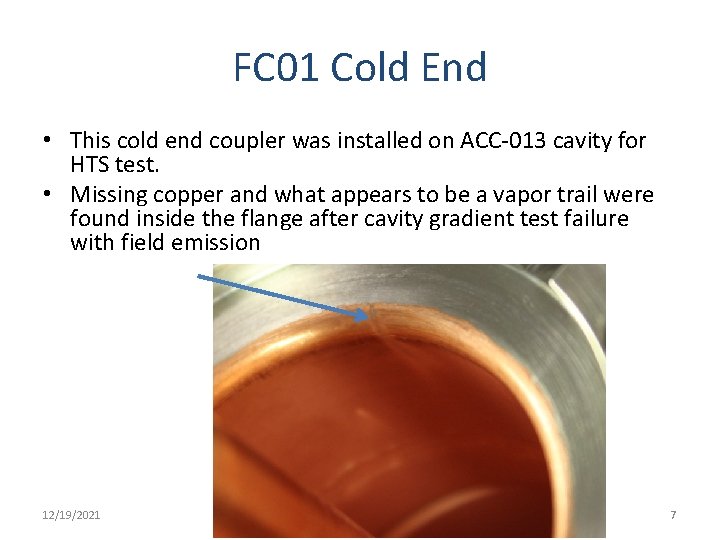
FC 01 Cold End • This cold end coupler was installed on ACC-013 cavity for HTS test. • Missing copper and what appears to be a vapor trail were found inside the flange after cavity gradient test failure with field emission 12/19/2021 7
FC 01 (Cont. ) • Was returned to SLAC by FNAL for examination for additional damage or defects. • Our examination located an additional area further inside the coupler that similar to the “vapor trail” located at FNAL after HTS. • Cause of failure: Antennae misalignment? Aluminum seal? Copper Plating defect? 12/19/2021 8
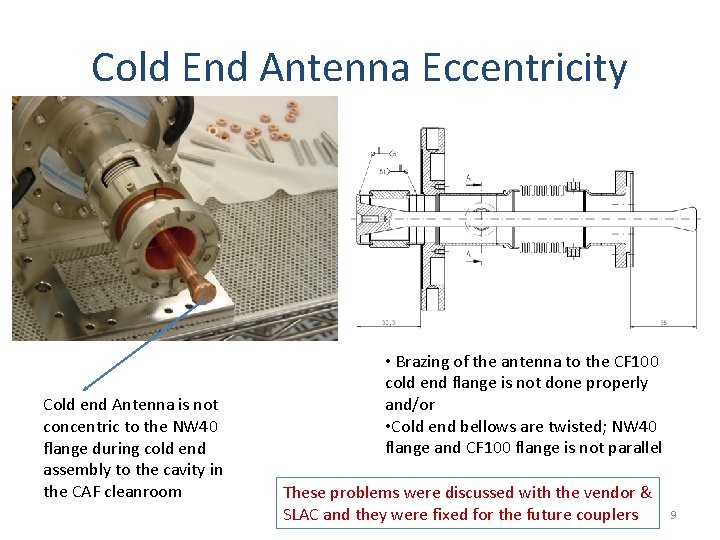
Cold End Antenna Eccentricity Cold end Antenna is not concentric to the NW 40 flange during cold end assembly to the cavity in the CAF cleanroom • Brazing of the antenna to the CF 100 cold end flange is not done properly and/or • Cold end bellows are twisted; NW 40 flange and CF 100 flange is not parallel These problems were discussed with the vendor & SLAC and they were fixed for the future couplers 9
FC 10 Cold End • This cold end coupler was installed on ACC-016 cavity for HTS test • The coupler had been previously sent back to the vendor (from SLAC) for mechanical rework (concentricity issues) • After return from the vendor, the coupler was inspected, processed and shipped to FNAL • Copper flakes were found on tip of antennae after HTS and cavity gradient test failure due to FE. • Cause of failure and flaking: Poor plating process during rework? Damage to first layer of plating during rework? 12/19/2021 10
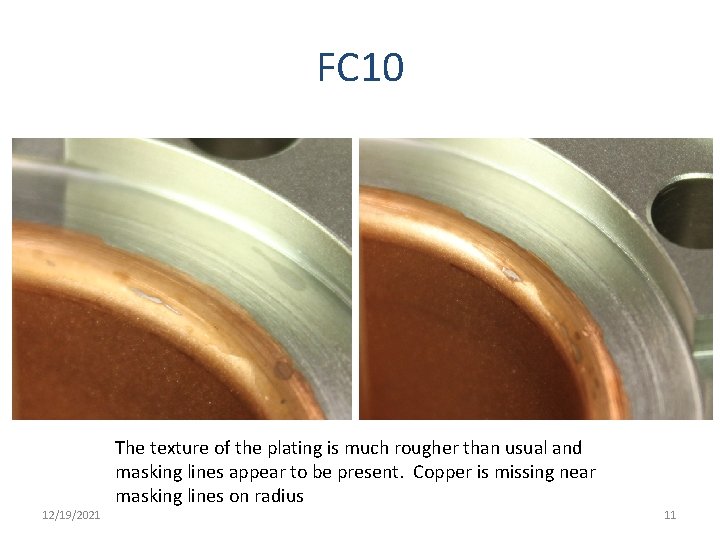
FC 10 12/19/2021 The texture of the plating is much rougher than usual and masking lines appear to be present. Copper is missing near masking lines on radius 11
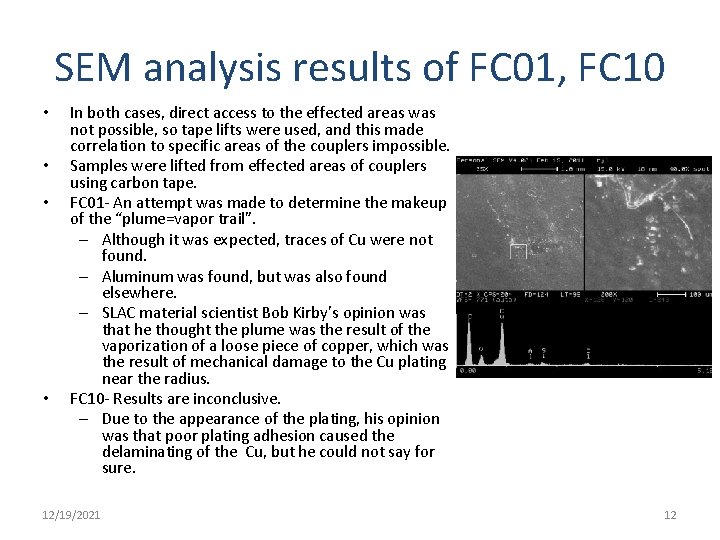
SEM analysis results of FC 01, FC 10 • • In both cases, direct access to the effected areas was not possible, so tape lifts were used, and this made correlation to specific areas of the couplers impossible. Samples were lifted from effected areas of couplers using carbon tape. FC 01 - An attempt was made to determine the makeup of the “plume=vapor trail”. – Although it was expected, traces of Cu were not found. – Aluminum was found, but was also found elsewhere. – SLAC material scientist Bob Kirby’s opinion was that he thought the plume was the result of the vaporization of a loose piece of copper, which was the result of mechanical damage to the Cu plating near the radius. FC 10 - Results are inconclusive. – Due to the appearance of the plating, his opinion was that poor plating adhesion caused the delaminating of the Cu, but he could not say for sure. 12/19/2021 12
Explanation of failures on FC 01 & FC 10 • Both FC 01 and FC 10 had been sent back to the vendor for repair before SLAC processed them and we believe their subsequent failure was related to the work the vendor did: – For FC 01 they had removed the excess copper in the gasket area adjacent to the location where small copper strip came off during operation (thus they may have loosened the plated copper while removing the excess). – For FC 10, they had bead blasted the plated copper after they made a fix to the concentricity problems: • however, if they had masked off the copper in the gasket area and the rim; either the masking material weakened the copper adhesion or contaminated it, so electron multipacting occurred, which smoothly eroded the copper during testing, leaving the flakes it was observed at FNAL after horizontal test. • No other couplers have show these problems. 12/19/2021 13
Ultrasonic Cleaning Test at SLAC • • Purpose of ultrasonic cleaning test: – Ultrasonic processing could help to loosen poorly adhered particles of copper – Could collection of particles generated by ultrasonic processing help assess plating quality? Equipment and setup: – Existing ultrasonic tank and transducers were used • Volume: 180 liters of ultrapure water • Power transducers: 2 x 1200 W = 2400 W • Frequency: 40 KHz, with sweep capability of +- 2 KHz • Max power density: 13. 3 W/liter (full power and 180 liter volume) – Tooling was made to hold coupler in vertical position (antennae up) – Filtration system • Vacuum flask with replaceable filters (0. 3 micron) 14
Ultrasonic Cleaning Test (cont) • • Ultrasonic power test procedure and parameters: – Coupler is mounted in fixture with antennae up – Coupler is filled completely with ultrapure water – Coupler and stand is placed in ultrasonic bath • There is no mixing of bath water and water in coupler – Ultrasonic power is turned on and the couplers are processed: • 15 minutes • Full power • 40 KHz, no sweep – Water from the coupler is captured in the filtration system • Water is poured into funnel • Water is drawn through filter into vacuum flask • Filter is removed, labeled, and stored in containers for analysis Rinse only test procedure and parameters – Water is poured directly into filtration system 15
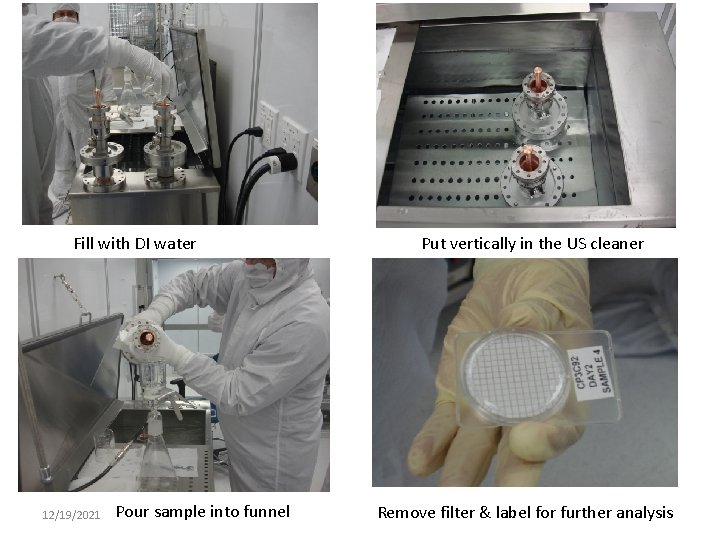
Fill with DI water 12/19/2021 Pour sample into funnel Put vertically in the US cleaner Remove filter & label for further analysis 16
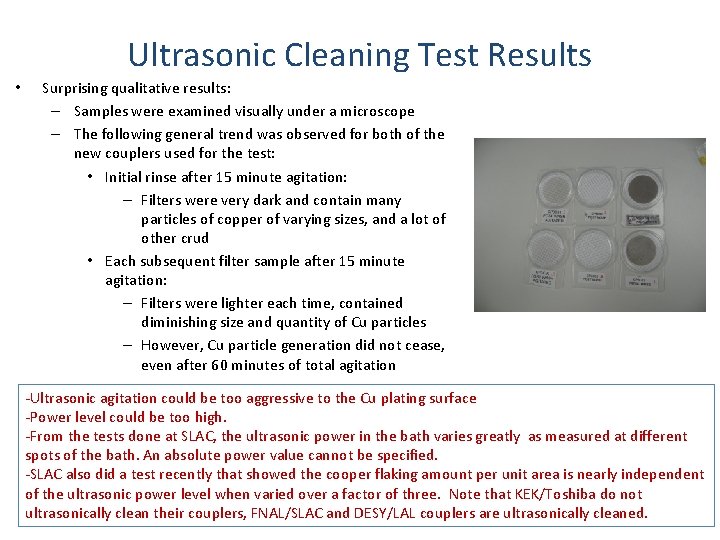
Ultrasonic Cleaning Test Results • Surprising qualitative results: – Samples were examined visually under a microscope – The following general trend was observed for both of the new couplers used for the test: • Initial rinse after 15 minute agitation: – Filters were very dark and contain many particles of copper of varying sizes, and a lot of other crud • Each subsequent filter sample after 15 minute agitation: – Filters were lighter each time, contained diminishing size and quantity of Cu particles – However, Cu particle generation did not cease, even after 60 minutes of total agitation -Ultrasonic agitation could be too aggressive to the Cu plating surface -Power level could be too high. -From the tests done at SLAC, the ultrasonic power in the bath varies greatly as measured at different spots of the bath. An absolute power value cannot be specified. -SLAC also did a test recently that showed the cooper flaking amount per unit area is nearly independent of the ultrasonic power level when varied over a factor of three. Note that KEK/Toshiba do not ultrasonically clean their couplers, FNAL/SLAC and DESY/LAL couplers are ultrasonically cleaned. 17
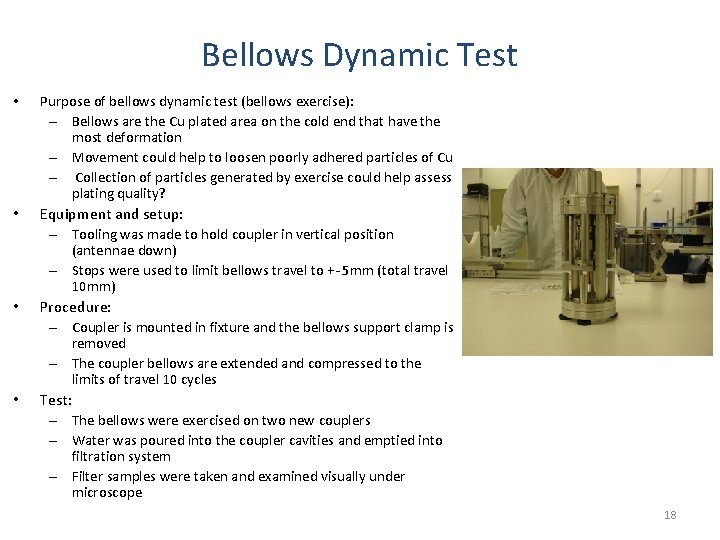
Bellows Dynamic Test • Purpose of bellows dynamic test (bellows exercise): – Bellows are the Cu plated area on the cold end that have the most deformation – Movement could help to loosen poorly adhered particles of Cu – Collection of particles generated by exercise could help assess plating quality? • Equipment and setup: – Tooling was made to hold coupler in vertical position (antennae down) – Stops were used to limit bellows travel to +- 5 mm (total travel 10 mm) • Procedure: – Coupler is mounted in fixture and the bellows support clamp is removed – The coupler bellows are extended and compressed to the limits of travel 10 cycles • Test: – The bellows were exercised on two new couplers – Water was poured into the coupler cavities and emptied into filtration system – Filter samples were taken and examined visually under microscope 18
Bellows Dynamic Test Results • Results were comparable for both couplers • Qualitative visual assessment of filters indicates that Cu particles are generated by the exercise • Particles are larger than those generated by ultrasonic agitation alone • Subsequent filter tests taken after an additional 15 min agitation produced similar results: many Cu particles • Conclusions of bellows exercise test: – Bellows exercise helps to loosen Cu particles – It is not conclusive that particles generated indicate poor plating quality – Bellows exercise will be incorporated into the coupler inspection procedure by SLAC: this exercise has been added to the procedure prior to ultrasonic cleaning with detergent as an additional way to assure that loose particles are removed prior to conditioning. 19

Copper Plating Quality Tests • Several flat test coupons were produced by the vendor and by SLAC for these tests. • The purpose of the tests was to cross compare coupons plated at the vendor and SLAC to understand similarities and differences used in the pre, during and post plating processes. • Coupons: 5 x 5 cm square, plated with 10 and 30 micron thick copper using the cyanide copper process. • The vendor provided 19 coupons (10 post plating bead blasted, 9 without post bead blasted). • SLAC provided 8 non-bead-blasted (4 with 10 micron thick plating and 4 with 30 micron thick plating). 12/19/2021 20
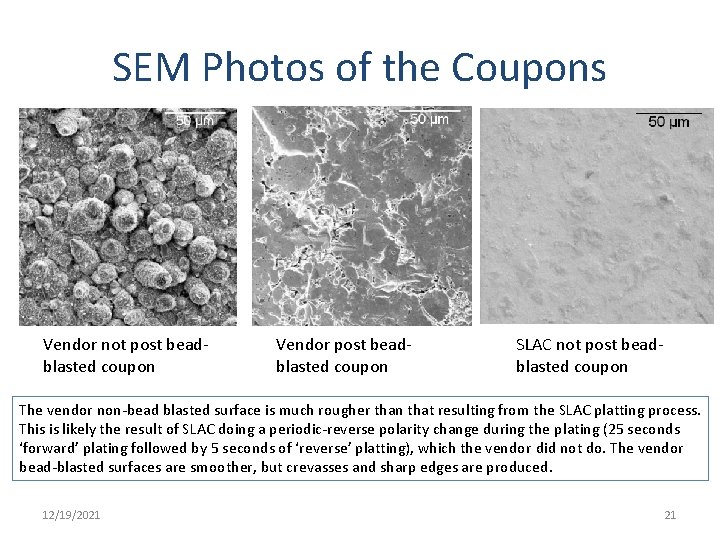
SEM Photos of the Coupons Vendor not post beadblasted coupon Vendor post beadblasted coupon SLAC not post beadblasted coupon The vendor non-bead blasted surface is much rougher than that resulting from the SLAC platting process. This is likely the result of SLAC doing a periodic-reverse polarity change during the plating (25 seconds ‘forward’ plating followed by 5 seconds of ‘reverse’ platting), which the vendor did not do. The vendor bead-blasted surfaces are smoother, but crevasses and sharp edges are produced. 12/19/2021 21

Coupon Test Procedure • • To test the coupons for flaking, each one was ultrasonically cleaned three times for 15 minutes at the nominal transducer power setting of 1. 6 k. W, 40 k. Hz with no frequency sweep. Each coupon was suspended in a pre-cleaned glass container using a stainless steel wire. Ultrapure water was filled within 6 mm of the brim in the glass containers and in the outside tank. Before coupon cleaning, power levels were measured with a PB-500 Magasonic Ultrasonic Energy Meter/Probe, and ranged from 8 to 30 W/inch². Filter sampling was done after each ultrasonic bath and after a rinse cycle following the first bath. The bath water was poured through a 47 mm diameter Millipore hydrophilic membrane that captures particles greater than 0. 45 µm. A one square mm region was photographed with a VZM-200 Digital Video Measurement System and rendered into a 3 D image based on surface brightness: – Copper particles appear as peaks, and a software application was used to determine their sizes. The particles were counted by hand grouped in three categories: greater than 25 µm, 10 -25 µm and less than 10 µm. The count was limited to 50 in each category. 12/19/2021 22
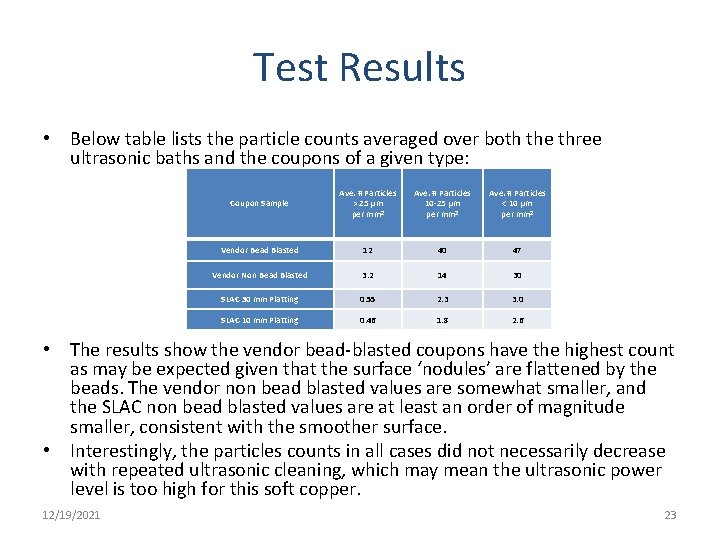
Test Results • Below table lists the particle counts averaged over both the three ultrasonic baths and the coupons of a given type: Coupon Sample Ave. # Particles > 25 µm per mm² Ave. # Particles 10 -25 µm per mm² Ave. # Particles < 10 µm per mm² Vendor Bead Blasted 12 40 47 Vendor Non Bead Blasted 3. 2 14 30 SLAC 30 mm Platting 0. 55 2. 3 3. 0 SLAC 10 mm Platting 0. 46 1. 8 2. 6 • The results show the vendor bead-blasted coupons have the highest count as may be expected given that the surface ‘nodules’ are flattened by the beads. The vendor non bead blasted values are somewhat smaller, and the SLAC non bead blasted values are at least an order of magnitude smaller, consistent with the smoother surface. • Interestingly, the particles counts in all cases did not necessarily decrease with repeated ultrasonic cleaning, which may mean the ultrasonic power level is too high for this soft copper. 12/19/2021 23
Summary-I • Although the vendor plating with or without bead blasting produces copious copper flakes during ultrasonic cleaning, subsequent water rinses w/o agitation do not show further copper removal. • Also, after RF processing one of the coupler pairs, the two cold ends were removed from the test set-up in the Class 10 cleanroom at SLAC. A visual inspection and a filtered nitrogen blow-out with a particle counter showed no indication that particles had been generated during the 50 hours of RF operation. In the future, a filtered rinse sample will be taken from a cold section that has been installed and operated in the FNAL HTS to look for particles. • Given that recent cavities with bead-blasted couplers achieved gradients greater than 33 MV/m at FNAL suggests that the plating is not a major issue, although some of the cavities showed X-ray bursts. Nonetheless, the vendor should improve the plating process in future couplers to further reduce the possibility of cavity contamination. 12/19/2021 24
Summary-II • Inspection and Processing Changes at SLAC – Incoming inspection • Exercise bellows prior to ultrasonic cleaning in order to help remove loose particles. • Calibrated video capture (boroscope) of 100% of interior plating surfaces. This will help with diagnostics in case of future problems. – Ultrasonic cleaning • No changes to power level and duration that is currently used (15 minutes, full power). • Post cleaning rinse time is increased to make sure all loose particles are removed. • Filter sample is taken as quality assurance step before 12/19/2021 drying and RF power conditioning. 25
- Slides: 25